.jpg)
Wow…it is here (already!). This one really snuck up on me! The Tour de Freaks is brought to you by your fabulous Control Freak Swappers each month! This month's theme is Holiday Gift Items and Snowman Theme! You may have just come from Wendy Weixler's blog weren't her projects fabulous? I love her work! If you are arriving prior to November 20th, please be aware that not all of the links may be working yet! Now…onto my projects!
I'm disappointed that the photo of this doesn't show you how CUTE it really is in person!!! The Candy Cane Christmas Designer Paper just SPARKLES when it catches the light! This fun Countdown to Christmas Calendar is made with the Petal Card Punch and strung along the 1/8" Real Red Taffeta Ribbon. Inside each little "envelope" is a 1" Whisper White square stamped with the images from Jolly Jingle Bits stamp set! There are exactly 24 images, so it worked out perfectly!
Here is a picture of them hanging "closed".
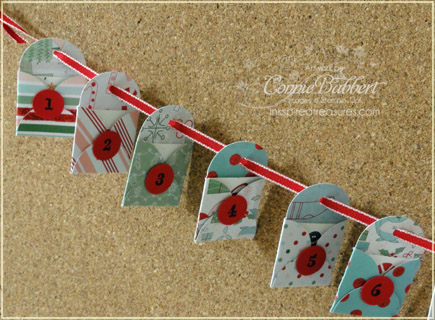
And here it is after they have been "opened".
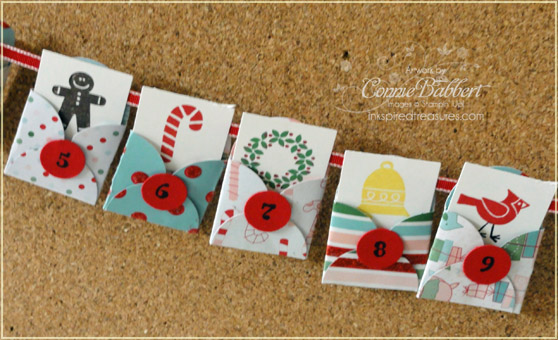
The final 24th one being Santa, of course. (I just noticed that I didn't color his face in…so pretend it is done and some Dazzling Diamonds on him…guess I was interrupted by my phone call with my SAM!)
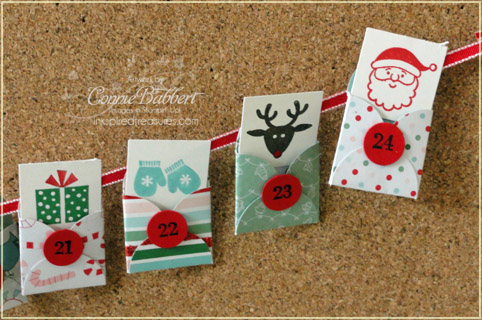
I think it is fun that they all stay open after they are revealed! You could write a little note on the back, or give a clue on where a little present or trinket is hiding! Make a little game of it for your family!
Here is a picture of it hanging on my cork board, but it will be cute hanging on a fireplace or cabinet!
Click on photo for a larger picture!

Some details…it really was quite simple! I punched out the 24 Petal Card Punches from A Candy Cane Christmas Designer Paper and folded the sides and bottom to make a little envelope and adhered it closed. I used Calendar Alphabet and stamped in Basic Black on Real Red with the numbers 1 thru 24, then punched them out with the 1/2" Circle Punch and adhered them to the front with Mini Glue Dots. I used Stampin' Write Markers to color in the images from Jolly Jingle Bits in the colors of Early Espresso, Daffodil Delight, Garden Green, Baja Breeze, Real Red, and Basic Black. I used the Crop-a-Dile to punch a small hole in each of the Envelope tops and strung the 1/8" Real Red Taffeta thru from back to front. They stay in place pretty well, but you could adhere them to the ribbon with a Mini Glue Dot if you wanted them a little more secure.
OK…my next project is a Snowflake Ornament using the Sweet Treat Cups. I was inspired by Erica Cerwin's ornament and my club members did this version last night in class! I did add a little more bling with some White Chunky Essentials Glitter added with Two-Way Glue to the Snowflake. I made the Snowflake sturdier, by gluing two Shimmer White pieces of cardstock together with the Glue Stick and running it thru the Big Shot with the Snowflake Die. It is hard to see how sparkly it is!
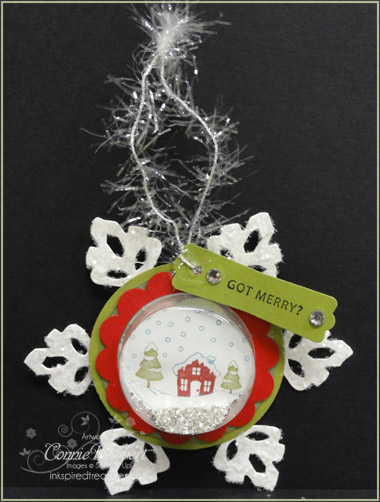
I used the Sweet Snowglobe a la carte image for the inside, using Old Olive, Riding Hood Red and Marina Mist Stampin' Write Markers to color in the image and stamped on Whisper White. It was punched with the 1 3/4 Circle Punch. I made the Real Red "collar" by punching the 1 3/4 Circle, then the 2 3/8 Scallop Circle around it. The Sweet Treat Cup has Silver Glass Glitter inside and then is layered on the 2 1/2 Circle of Old Olive. That is adhered to the snowflake!
I used my Crop a Dile and punched a hole in the top for the Clear Tinsel Ribbon and added the Modern Label tag stamped with the Got Merry? greeting from Stampin' Up!'s Got Treats stamp set and added some Rhinestone Jewels! This would make a fun little gift for an office worker, teacher or friend!
I can't wait to see what the rest of the Control Freak Swappers did for the Tour de Freaks this month! I'm SURE you'll get some wonderful ideas! Next stop is Barb Mullikin…a new face to the Tour! Enjoy!
.jpg)
