It's time for the monthly Tour de Freaks, brought to you by the Control Freak Swappers! The theme this month is Spring/Easter! I know I'm wishing for spring around here…we are in for a COLD week in Ohio! You may have just arrived from Wendy Weixler's blog…weren't her projects FUN! Make sure to continue on around to all the stops and see all the projects we have for you!
My first card is a Cascade Card. I've always wanted to make one. I had one of my customers request this card for a recent class. I used the Blossom Punch and Sycamore Street Designer Paper on mine because it was for a class setting…but I think it would be fun done with the Secret Garden stamps and Framelits, too! I love how the design flows and is 3D, yet it folds up to fit flat in a regular sized envelope (except for those Pearls, of course!) I also thought it was a great way to showcase the Sale-A-Bration Designer Paper, Sycamore Street, that I am going to miss SO MUCH!!! Remember, SAB ends on Friday, so you need to grab yours now!
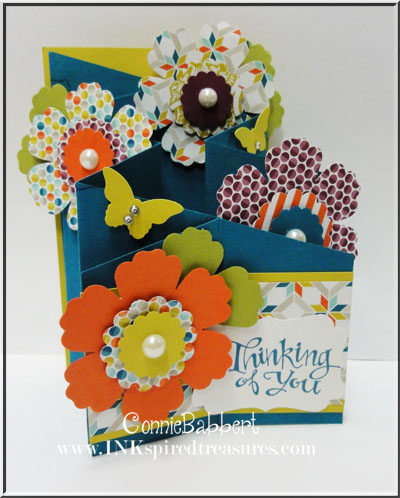
Some quick details:
- The base is two diagonal pieces interlocked together of Island Indigo cardstock. I stamped them with a couple of the Secret Garden open line images in Island Indigo ink.
- I used Summer Starfruit on the back to give it some stability.
- I used the Blossom punch, the 1 1/4" Scallop Circle and 7/8" Scallop Circles for the flowers, placing Stampin' Dimensionals between each layer and adding a Large Pearl in the center.
- I punched a couple Bitty Butterflies from Summer Starfruit and added Rhinestone jewels for the bodies.
- The Sassy Salutations greeting was stamped with Island Indigo on Whisper White and punched with the Decorative Label punch.
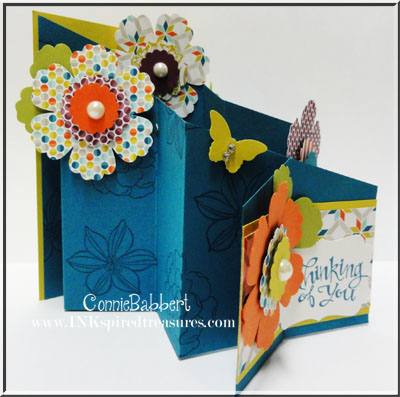
Here's a side view:
Next is a little decoration that I pulled together pretty quickly! I just don't have that many Spring or Easter decorations, so this worked out perfectly!
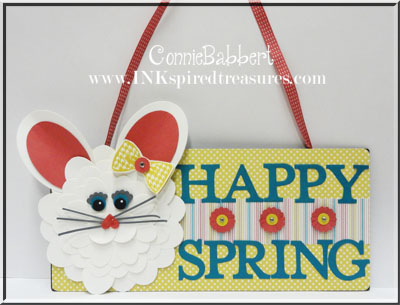
Isn't this a FUN sign for your house? I have it hanging on my cabinet doors. The base is a metal sign I found measuring about 4 1/2 x 10 1/2. I just covered up the front. And…isn't that bunny so fluffy looking? Really cute! The bow in her hair is from Dapper Dad…I knew I could use that bowtie as a feminine bow! It is double layered…I know you can't see it from this angle. Here's a closeup of the bunny itself.
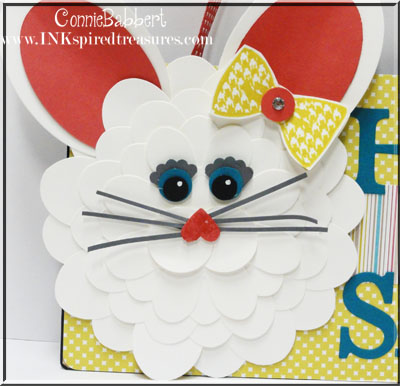
A few details for you:
- The bunny base is made with the Flower Folds XL Die, I used two each of the three largest sizes cut from Whisper White cardstock.
- The nose/muzzle is two 1" circles of Whisper White, on top is the Small Heart from Primrose Petals cardstock, sponged with Primrose Petals Ink. I cut fine strips of Basic Gray cardstock for the whiskers.
- The eyes are 1/2" Circles of Island Indigo, with 3/8" Circles of Basic Black, highlighted with a White Gel Pen. I added the eyes to the Basic Gray 7/8" Scallop Circles, cut for "lashes".
- The ears are two Oval Framelits, larger cut from Whisper White and inside cut from Primrose Petals cardstock. I adhered between the two largest sizes of Flower Folds and slightly curled them.
- I stamped the bowtie from Dapper Dad twice with Summer Starfruit Ink, cut them out and adhered together with a Stampin' Dimensional in the center. I added a 1/2" Circle of Primrose Petals to the center and a Rhinestone Jewel.
- The background designer paper is from Birds of a Feather to cover the sign and the Typeset Alphabet Bigz letters were cut from Island Indigo cardstock.
- Finally, the flowers were punched with the 7/8" Circle from Primrose Petals, cut slightly towards the centers to form petals. I added a 3/8" Circle of Summer Starfruit inside each one and added a Rhinestone Jewel.
- I added Primrose Petals Stitched Ribbon to the back of the sign to form the hanger.
Isn't she CUTE???? I think so! She really was QUICK to put together and would fit on any size sign you might have!
The next stop on the tour is Lisa Martz…our group mom, who always has fabulous projects! Make sure you continue on around for more fun projects with the Easter/Spring theme!
.png)
.png)
