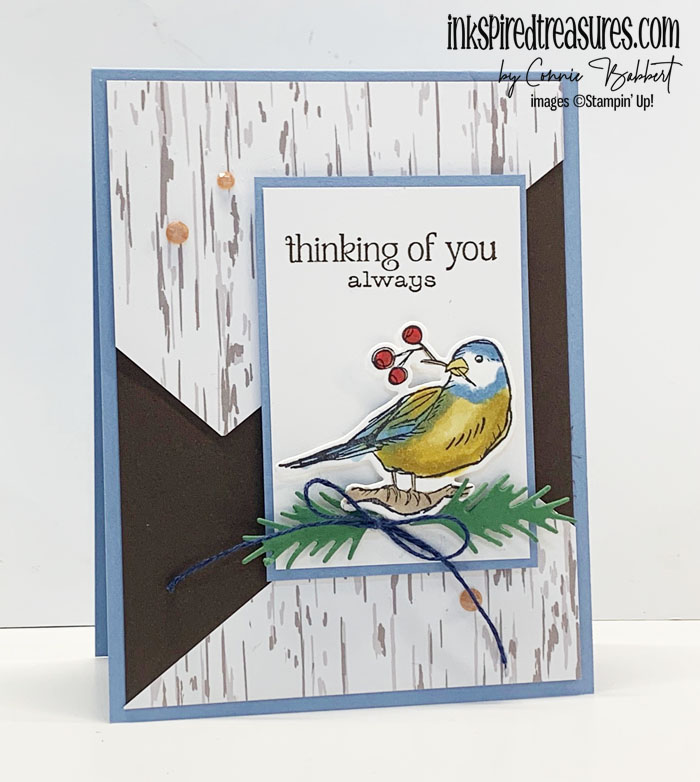
It’s Thursday and you know that means it is time for a Create with Stamping Friends Thursday Challenge. This sketch has a unique background design that was a lot of fun!

WINTERLY TREE TOPS
Winterly Tree Tops is a new Stampin’ Up! bundle (part of the Nests of Winter Suite) that will be in the Sept-Dec Mini Catalog! Demonstrators attending the Creativity Now Online Stamping Event were able to purchase it in advance! I loved working with it!
Stampin’ Details:
- The base is 4-1/4 x 11 Boho Blue cardstock, scored at 5-1/2 and folded to form the base card.
- The 3 x 4 and 2 x 4 pieces of birch bark pattern in the Nests of Winter 12×12 Designer Paper pack had diagonal cuts made on them and then added to the front of a 4 x 5-1/4 layer of Early Espresso cardstock.
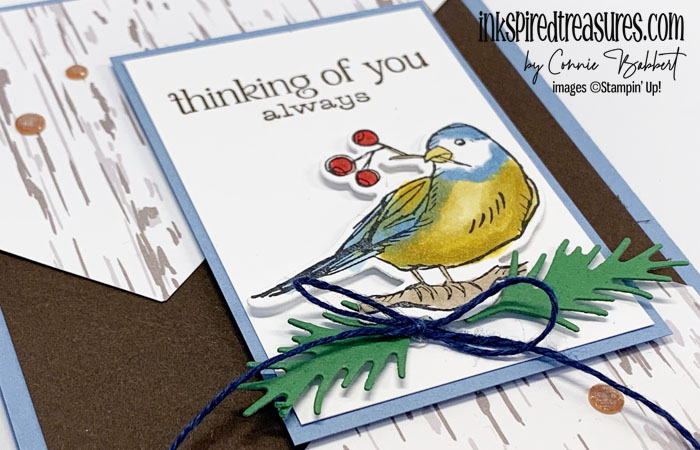
- The 2-1/4 x 3-1/4 piece of Basic White cardstock was stamped at the top with the greeting from Winterly Tree Tops in Early Espresso Ink.
- It was added to a 2-3/8 x 3-3/8 piece of Boho Blue cardstock.
- The single bird was stamped with Early Espresso Ink on Basic White cardstock and colored with Boho Blue, Wild Wheat, Crumb Cake and Real Red Stampin’ Blends. It was cut with the Winterly Tree Tops Die and added to the front with Stampin’ Dimensionals.
- Two pine branches were cut from Garden Green cardstock and added to the branch the bird is standing on.
- Some blue Natural Tones Linen Thread was tied in a bow and added to the pine branches.
- A trio of Earth Tones Shimmer Gems were added to the background designer paper.
That was a fun background to work with! OK, go check out what the rest of the Challenge Team did with this challenge over on Create with Stamping Friends.
Supplies:
Stamps: Winterly Tree Tops
Ink: Early Espresso
Blends: Wild Wheat, Boho Blue, Real Red, Crumb Cake Combos
Cardstock: Basic White, Boho Blue, Early Espresso, Nests of Winter 12×12 DSP
Accessories: Winterly Tree Tops Dies, Earth Tones Shimmer Gems, Natural Tones Linen Thread, Adhesives


Stampin' Up!'s SWEET BUGS BUNDLE showcases a sweet selection of garden critters helping to capture the joy of relaxing in the garden! Stamp the caterpillars, ladybugs, bees and others, then add mushrooms, flowers and garden touches to finish your creation. We've combined the SWEET BUGS BUNDLE and the CUTE AS A BUG 12x12 DESIGNER PAPER featuring even more images to cut out and use! You'll get step-by-step tutorials for SIX projects...4 regular cards and, 2 ENHANCED fun fold cards...to get you creating! See more details HERE


I’d love to CASE the boho blue card with the sentiment “Thinking of you always” on the front, with a single bird. Can you tell me how you cut the birch tree DSP to get that point on the ends of the diagonal cuts?
Thank you so much, great cards!
Sherry Broussard
Hi Sherry…I just used the measurements in my blog post for the DSP and kind of “blind” cut the diagonals until they looked right! Sorry it isn’t more precise. If it helps, the point on the top panel is 7/8″ from the left edge and 5/8″ down from the top of the right edge. The bottom point is 7/8″ from right edge and 1-1/4 from bottom right edge. Hope that makes sense.
Ok, thank you so much for your reply with those instructions, it helps a lot! ?
There shouldn’t be a question mark at the end! ?????