I used the cute little set, Wonderful Winterland, for my card set this past week on Create with Connie and Mary Card "Create"tions. We are finishing up the edition by showing our last favors with the sets that the Design team used this week! Check them all out on Create with Connie and Mary. Combine our favors with the matching card sets we did this week and you have a CLASS all ready to go!
My little favor is a smaller version of the Box #2 XL die we used to carry. It is quick and easy to make with a 6 1/2 x 6 1/2 piece of cardstock or designer paper!
.jpg)
Here are the details:
- Cut a 6 1/2 x 6 1/2 square of Pool Party cardstock.
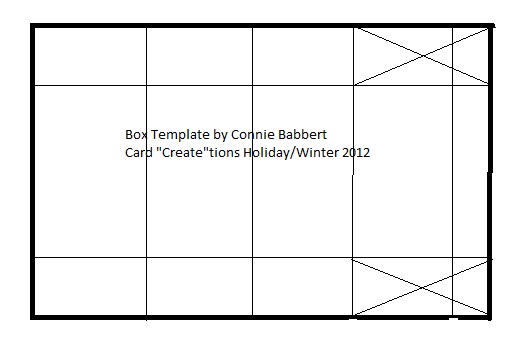
- On one side, score at 1 1/2, 3, 4 1/2 and 6, turn and score at 1 1/2 and 5.
- Cut the two tabs for the end with the 1/2" tab on each side for form the box lid. The 1/2' tab will fold into the box (see diagram).
- Cut slits from the sides to the score lines (4 of them) to form the box sides.
- Round the corners of the 1/2" lid.
- Stamp the outsides before you put it together, I used the snow flurries from Winter Wonderland in Pool Party ink.
- Fold the rounded tabs inside the box, use the center tab ends to cover the sides from the bottom up, use Sticky Strip to close.
- Tuck in the flap.
- Cut the large Apothecary Accent from Primrose Petals coordinating cardstock. Emboss with the Lacy Brocade folder
- Pierce a hole in one point of the Accent.
- Lay the Accent on the box and mark the inside where it folds across the top of the box, you will score on these lines.
- Cut off any excess tab on the back.
- Adhere Pool Party Baker's Twine from the top and around the bottom of the box, leave enough to wrap around the brad on the front.
- Adhere the back and top portions of the Accent to the box, leave the front flap un-adhered so it will open.
- Add the Vintage Brad the front.
- Bring the twine up to secure the box closed by wrapping it around the brad.
- Decorate the top with the Wonderful Winterland image, stamped in Black Stazon and watercolored with Primrose Pink, Pool Party and Raspberry Ripple Markers.
- Punch with the Decorative Label Punch.
- Adhere a 1/2" x 3 1/2 strip of Silver Glimmer Paper across box lid, add the Decorative Label Punch with Stampin' Dimensionals.
- Stamp Merry from Border Banter in Raspberry Ripple and punch with Small Jewelry Tag punch. Tuck under brad on front.
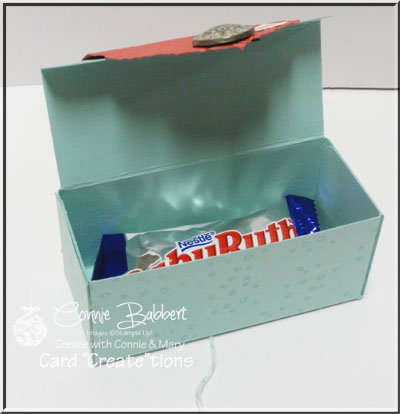
Here's a view of the inside.

And a quick photo of how the score lines and cut tabs look:

Again, make sure to check out what the rest of the Design Team did with the favors that match their card set! And…remember! It's not too late to join! See details over on Create with Connie and Mary!
