It's time! Time for the monthly Tour de Freaks! Check out what the Control Freak Swappers have been up to this month! You've probably just come from Lisa Martz's Blog…didn't you LOVE her projects? If you are here prior to February 20th, please note that not all links may be working yet!
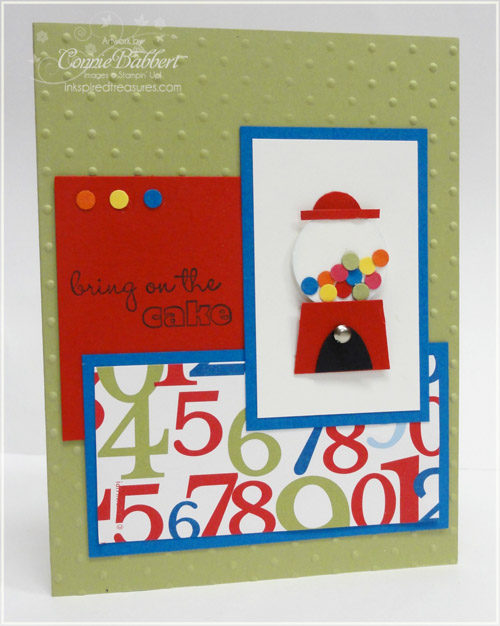
Our theme this month is Birthday cards and projects! I had SO much fun with my creation! It all started with some inspiration from Mercedes Weber for her mini gumball machine made with the Cupcake Punch. Using her idea, I designed my Mini Gumball card for my Punch Class this month…then went on to expand the idea…

I started with a base of Pear Pizzazz cardstock and ran the front thru the Big Shot with the Perfect Polka Dots Impressions Folder. I used a piece of the numbers pattern from Celebrations Designer Paper and layered it on Pacific Point cardstock. The base of the Gumball Machine is the Cupcake Punch Base turned upside down and with the scallop edge trimmed off. The black is the Small Oval Punch cut in half and a Silver Mini Brad. The globe is the 1" Circle punched from Whisper White and sponged with Bashful Blue around the edges. Of course, the "gumballs" are the sprinkles for the top of the cupcake on the punch. The Real Red topper of the machine is the very top scallop of the frosting with a little sliver of cut cardstock added. I added a square of Real Red cardstock in the background and stamped "Bring on the Cake" from Stampin' Up!'s Bring on the Cake stamp set. I also added three more "gumballs" as decoration over the greeting!
So, I thought if I could make a mini gumball from punches, how could I made a JUMBO sized one for the front of a card? Can you tell what the base of the gumball machine is????

If you guessed the Petal Cone Die...you are RIGHT! It is just the center part of the cone with the round top trimmed off and turned up for the base and the point trimmed off! I added the Basic Black Wide Oval Punch cut off and added a 5/16" Silver Jumbo Brad to the top…with some colored gumballs falling out. The other mechanism for the machine is just a 1/2" Circle of Real Red layered on a 3/4" Circle of Basic Black. The globe was cut with the 3" Circle DIe from Whisper White and the Medium Window Sheet (hard to see in the photo!) I sandwiched the 1/2" Circle Gumballs between those two layers. The top of the gumball machine is the round top I cut off from the Petal Cone Die and then a 3/4" Circle punch added behind it and a strip of Real Red cardstock for the front. The check background is the Celebrations Designer Paper again. The "From All of Us" from Family Phrases is stamped in Basic Black on Pacific Point and punched with a 1" Circle Punch. I LOVE how this turned out!
So…I thought if I could do a large Gumball Machine card…how about a FAVOR, too!

I cut TWO of the Petal Cone Diecuts from Real Red, cut off the points and round top, turned it upside down and build a "pyramid" looking box with an opening at the top. I did the front of the machine the same way I made the large card. I used a Medium Cello Bag, filled it with gumballs, tied it off with 1/8 Pumpkin Pie Taffeta Ribbon, and formed it into a rounded shape. I turned it upside down and placed the tied end into the opening of the box. The top of the Gumball Machine hides the pointed edge of the Cello Bag…I sandwiched it between two layers of the machine topper. Isn't it FUN, too? I do LOVE it! What a great party favor to use too coordinate with the card! And you could easily expand the theme with cupcake toppers, invitations, whatever!
.jpg)
So…hope you enjoyed my Gumball Machine Birthday Theme projects for the Tour de Freaks this month! Leave me a comment…I'd love to hear what you think about the projects! You can continue on the tour to visit my good friend, Mary Brown's blog and her AWESOME projects, by clicking on the button below! You'll circle around to my blog again when you are completely finished…there are 12 stops this month! Have fun!
.jpg)
.jpg)
 I've always wanted a stamp set with a gumball machine in it. Stampin' Up! used to have one, but I missed out on getting it. Stampin' Up!'s Something Sweet stamp set is just as cute as can be! What is fun, too, is that you can use the Sweet Treat Cups in them, too!
 I didn't want to use a red base for my gumball machine, so decided to make it Brocade Blue and Crushed Curry. After I stamped it, I cut it out, then adhered it to some Welcome Neighbor Designer Paper. I stamped "that was so sweet of you" directly on the Designer Paper in Basic Black. The Designer Paper was adhered to a layer of Melon Mambo, and then the layer of Crushed Curry cardstock. I wrapped the Melon Mambo Polka Dot Ribbon to the back of the Crushed Curry layer. Then stamped Thanks so Much from Happy Thoughts in Basic Black and punched with the 1 1/4 circle punch. It is layered on a punched 1 3/8 circle of Brocade Blue. I added a Summer Sun Corduroy Button brad to the center and popped it up with Stampin' Dimensionals. The gumballs I used Brocade Blue, Melon Mambo and Crushed Curry for the colors and punched them out with the 1/2 circle punch.