• Create with Connie and Mary
  • Clearance Rack Deals!
  • Tutorials for Sale
  • Skip to primary navigation
  • Skip to main content
  • Skip to primary sidebar

Inkspired Treasures

Connie Babbert, Stampin Up! Demonstrator

  • Home
  • Events
  • Shop My Online Store
  • Latest Catalogs
  • Join My Team
    • Sign Up!
  • Retired SU Products for Sale
  • Show Search
Hide Search

CCMC-HOL3 – Special Card Challenge

October 8, 2011 By Connie | 10 Comments

Today on Create with Connie and Mary Holiday Edition we have a Special Card Challenge for our subscribers to play along and win PRIZES!  The theme for this week is a One of a Kind or Special Christmas Card!  You know, one of those that you only make ONE of because of the details or time involved!  Check out the AWESOME cards made by our Design Team over on Create with Connie and Mary!


Here is my Special Card using various sized Scallop Circles and the medallion technique with my Simply Scored Tool to make a PLEATED CHRISTMAS TREE!  Isn't that COOL looking?  I was SO excited when it was done!


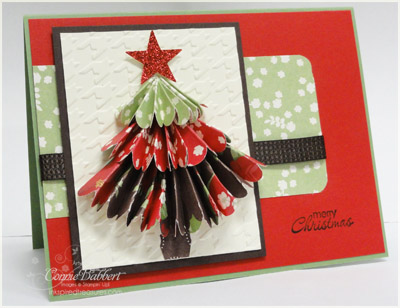
I used the Scallop Duo Die for the small top one and the larger bottom one in two different papers, then the 2 3/8" Scallop Punch for the center one.  All patterns were from the Holly Berry Designer Paper package.  To make the medallion, I used my Simply Scored Tool to score from inside scallop to inside scallop on the opposite side of the circle, then cut a slit from the inside of one of the scallops to the center.  I pleated the folds and pressed to make the 1/2 medallion.  I cut the tree trunk from one of the patterns, making sure I got mostly the Early Espresso color.  The top is a Small Star from the Stars Die and Red Glimmer Paper.


Next was the tricky part…to have them hold the tree shape and not pop out too far.  I used Mini Glue Dots to secure them in several places on the card and at the top of each peak.  I adhered the tree to Very Vanilla that I ran thru the Big Shot with the Houndstooth Impressions Folder and layered on Early Espresso.  The background I kept simple with a piece of the designer paper, wrapped with Early Espresso Quilted Ribbon and secured in the back.  I stamped Merry Christmas from Petite Pairs in Early Espresso on the Real Red, then layered onto the base of Wild Wasabi.


This definitely wouldn't be a card you would mail very easily…but would be a beautiful presentation for someone along with their gift…or placed on a tag for the gift!


Make sure you check out the rest of the fabulous Design Team cards over on Create with Connie and Mary!  We've just finished up our third week and are getting ready to begin THREE full weeks of Christmas ideas every day!  It's not too late to join!  You still have access to all the projects we've already done and will be one of the first to see new ones as they are posted every day!

Filed Under: Cards, Create with Connie and Mary Tagged With: Connie Babbert, Holly Berry, Pleated Christmas Tree, Stampin' Up!

I love stamping cards, altering 3D items and making little favors. I've been stamping for over 20 years and will have my 19th year Stampin' Up! anniversary in early May. I love being part of something that sparks my creativity and hear people comment, "you MADE this?" I also enjoy sharing that passion with others in my classes! If you live anywhere in the Delaware, Dublin, Powell, Lewis Center, Hilliard or surrounding Columbus, Ohio areas, join us! I love to meet new stamping friends. Email me for a current class schedule... I'm adding new classes all the time!

Reader Interactions

Comments

  1. Annette says

    October 8, 2011 at 8:52 am

    Connie, this tree is just too cute. Thank you so much for sharing the instructions. I can't wait to try it out.

  2. Kristen says

    October 8, 2011 at 9:32 am

    I love this idea! Thanks for sharing love the falling leaves on your site very cool!!

  3. mary young says

    October 8, 2011 at 11:04 am

    gorgeous! really well done- thanks for the instructions-

  4. Joan says

    October 8, 2011 at 12:45 pm

    Great idea, and a lovely card.  Thanks for sharing.
     
    Love Joan xx

  5. Kris McIntosh says

    October 8, 2011 at 4:31 pm

    Simply gorgeous.  Thanks for sharing how you made the tree.  Really it is quite stunning.

  6. Cathy Parlitsis says

    October 8, 2011 at 5:42 pm

    YOU KILL ME!  I love how you make this sound easy!  It's only easy for creative people like YOU!  But…thanks for sharing it!  I really do love it!
    Maybe for Christmas, I'll send a note saying…if you want to see your Christmas card, visit Connie's blog…and there it is!
    Awesome card!

  7. Linda Duensing says

    October 10, 2011 at 4:37 pm

    This card is absolutely beautiful.  Thanks for sharing and giving the instsructions.
    Linda D.

  8. jane says

    October 11, 2011 at 1:59 pm

    what a fabulous card! I love it. TFS!

  9. Debbie Henderson says

    October 11, 2011 at 6:50 pm

    What a clever way to create a tree! Love it!

  10. Carrie Sampsel says

    October 13, 2011 at 12:23 am

    I just love how you made that tree.  How creative!!

Leave a Reply Cancel reply

Your email address will not be published. Required fields are marked *

Primary Sidebar

Use HOST CODE: SW7NGG27


Ice cream, ice cream, we all scream for ice cream!  And, of course, popsicles, too!  For our latest Collection of tutorials, we are using the Sweet Ice Cream Stamp Set and Ice Cream Cone Builder Punch!  You’ll get SIX unique tutorials that include four cards (one a special fold), a treat box and a special 3D favor!   See more details HERE!


Stampin’ Up!’s FLOWERING CACTUS PRODUCT MEDLEY is a GREAT value and everywhere you look, cacti are featured as part of home décor!  We loved the whimsical cactus images and “punny” greetings in the stamp set, so just had to use it for our next Collection!  The Flowering Cactus Product Medley kit comes with stamps, dies, designer paper, felt flowers, and two colors of linen thread, everything you need to make it EASY to create!  You’ll get FOUR unique tutorials that include three cards (one a special fold), and a fun organizing project! See more details HERE!


Connie Babbert
Stampin’ Up! Demonstrator
Lewis Center, OH
614-371-8484


Subscribe to Blog via Email

Enter your email address to subscribe to this blog and receive notifications of new posts by email.

Archives

Categories

Disclaimer

As an independent Stampin’ Up! demonstrator, all of the content on this blog is my sole responsibility and the use of and content of the classes, services, or products offered is not endorsed by Stampin’ Up!

The contents of my blog are my own and ©Connie Babbert and as such may not be copied, sold, changed or used as your own for ANY magazines, contests, Stampin’ Up! events, swaps, profits or otherwise without my permission and is here solely for the purpose of inspiration, viewing pleasure and enjoyment. Thank you for understanding.

Content © Connie Babbert, All Rights Reserved. Genesis framework customized by WebsByAmy.com