• Create with Connie and Mary
  • Clearance Rack Deals!
  • Tutorials for Sale
  • Skip to primary navigation
  • Skip to main content
  • Skip to primary sidebar

Inkspired Treasures

Connie Babbert, Stampin Up! Demonstrator

  • Home
  • Events
  • Shop My Online Store
  • Latest Catalogs
  • Join My Team
    • Sign Up!
  • Retired SU Products for Sale
  • Show Search
Hide Search

Control Freaks Blog Hop June 2018

June 19, 2018 By Connie | 1 Comment

Hi!  Welcome to the monthly Tour de Freaks, brought to you by the Control Freak Swappers!  This month our theme is NEW CATALOG HAPPINESS!  I think stampers can agree that new catalog time is one of our FAVORITE times of the year!  You’ve probably just come from Melissa Davis’s blog...love her projects, don’t you?  Just click on the link below to take you around the entire blog hop for some GREAT inspiration!

Styish Christmas

I love the look of this stamp set…and I love poinsettias!  A match made in heaven, right?  I also just got my order that had the Kraft Pillow Boxes…so cute with those polka dots, isn’t it?  One of my favorite color combos is Real Red and Kraft/Crumb Cake…and I LOVE the new Shaded Spruce for Christmas!  So…here we go!

Stampin' Up! Stylish Christmas

Here’s a closeup of the card:

  • The base is 5-1/2 x 8-1/2 Shaded Spruce cardstock, scored at 4-1/4 and folded.
  • On the 4 x 5-1/4 piece of Neutrals Designer Paper (Crumb Cake) some Real Red Cotton Ribbon was added towards the left side and adhered in the back, then the layer was added on top of the base card.
  • Two Poinsettias from Stylish Christmas were stamped with Real Red Ink side by side (just barely touching) on Whisper White cardstock and then hand-cut.  They were popped up on the front with Stampin’ Dimensionals.
  • The leaves were stamped twice with Shade Spruce Ink on Whisper White and hand cut, then adhered under the poinsettias.
  • The greeting from Stylish Christmas was stamped with Shaded Spruce on Whisper White and cut with the Layering Shapes Oval, then adhered to a larger Scallop Oval of Shaded Spruce.  It is popped up on the front with Stampin’ Dimensionals slightly over the poinsettias.
  • Two Gold Faceted Gems were added in the center of the poinsettias.

Here’s a closeup of the card:

Stampin' Up! Stylish Christmas closeup

I altered the Pillow Box just a little!

Stampin' Up! Stylish Christmas Kraft Pillow Box

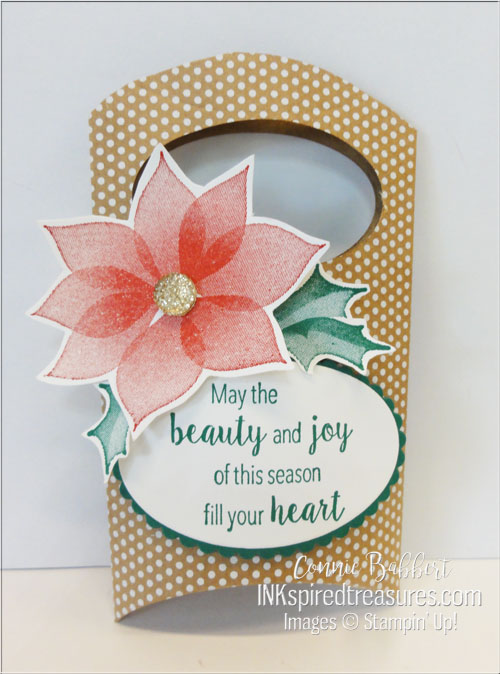
  • Following the line of the top of the Kraft Pillow Box while folded, cut off approx 1/2″ so that you don’t see the half moon thumb tab.
  • Using the Layering Shapes Oval, cut through both layers of the pillow box (run thru a couple times)
  • Stamp the greeting from Stylish Christmas with Shaded Spruce Ink on Whisper White and cut the the Layering Shapes Oval, then cut the Shaded Spruce cardstock with the Scallop Oval and adhere together.  Add to the front with Stampin’ Dimensionals.
  • Stamp a poinsettia with Real Red ink on Whisper White and hand-cut, then add to the front with Stampin’ Dimensionals.
  • Stamp the leaves with Shaded Spruce Ink on Whisper White and hand-cut, tuck under the poinsettia.
  • Add Gold Faceted Gem to the center.
  • Close up bottom of Kraft Pillow Box and fill!

LOVE how these turned out!  Hope you liked my projects!  OK…next up on the Control Freaks Blog Hop is Cindy Elam. I love her work, too, so  I know you’ll enjoy her projects, too!


Filed Under: Cards Tagged With: #christmasinjuly, #inkspiredtreasures, #stampinup, #stylishchristmas

I love stamping cards, altering 3D items and making little favors. I've been stamping for over 19 years and had my 18th year Stampin' Up! anniversary in early May. I love being part of something that sparks my creativity and hear people comment, "you MADE this?" I also enjoy sharing that passion with others in my classes! If you live anywhere in the Delaware, Dublin, Powell, Lewis Center, Hilliard or surrounding Columbus, Ohio areas, join us! I love to meet new stamping friends. Email me for a current class schedule... I'm adding new classes all the time!

Reader Interactions

Comments

  1. Donna Bagwell says

    June 20, 2018 at 11:52 am

    I love what you have done with the pillow box. And the colors you used for the card and altered box are very pretty.

Leave a Reply Cancel reply

Your email address will not be published. Required fields are marked *

Primary Sidebar

Use HOST CODE:  DFQD4KKC 


Could the Snail Mail Suite of products be ANY cuter?  Look at those little faces and those Resin Hearts…oh my!  We are using the Snailed It Stamp Set and Snail Dies for our next Collection of tutorials!  For this Snailed It Collection, we’ve made three cards (one a fun fold), and an absolutely FUN and unique favor box that is perfect for your stamp camps and classes!   You’ll want to make several to give away!  See more details here!


For our Friends are Like Seashells Collection, we’ve made FOUR cards (one a fun fold), a small favor and a 3D project that are perfect for your stamp camps and classes!   This bundle has a coordinating 3D Embossing Folder that can be used with the large die for a stamp, emboss and cut combo that has so much texture, they almost look real!  See more details HERE!

Next up for us to feature is the LOTS OF HEART Stamp Set and MANY HEARTS Dies!  Even with all the hearts, this bundle is more than just a Valentine set!  For this Lots of Heart Collection, we’ve made FOUR cards and TWO small favors, perfect to give someone you love or as a little thank you!  We’ve paired this bundle with the cute and colorful Snail Mail Designer Paper and accessories.  See more details HERE!


Connie Babbert
Stampin’ Up! Demonstrator
Lewis Center, OH
614-371-8484


Subscribe to Blog via Email

Enter your email address to subscribe to this blog and receive notifications of new posts by email.

Archives

Categories

Disclaimer

As an independent Stampin’ Up! demonstrator, all of the content on this blog is my sole responsibility and the use of and content of the classes, services, or products offered is not endorsed by Stampin’ Up!

The contents of my blog are my own and ©Connie Babbert and as such may not be copied, sold, changed or used as your own for ANY magazines, contests, Stampin’ Up! events, swaps, profits or otherwise without my permission and is here solely for the purpose of inspiration, viewing pleasure and enjoyment. Thank you for understanding.

Content © Connie Babbert, All Rights Reserved. Genesis framework customized by WebsByAmy.com