• Create with Connie and Mary
  • Clearance Rack Deals!
  • Tutorials for Sale
  • Skip to primary navigation
  • Skip to main content
  • Skip to primary sidebar

Inkspired Treasures

Connie Babbert, Stampin Up! Demonstrator

  • Home
  • Events
  • Shop My Online Store
  • Latest Catalogs
  • Join My Team
    • Sign Up!
  • Retired SU Products for Sale
  • Show Search
Hide Search

Control Freaks September 2019

September 19, 2019 By Connie | Leave a Comment


Hi! Welcome to the monthly Tour de Freaks, brought to you by the Control Freak Swappers!  The theme this month is Autumn or Halloween!  Great!  Stampin’ Up! has some EXCELLENT stamping bundles for this theme!

You’ve probably just come from the awesome Julie Davison, she always has awesome projects! Just click on the link below to take you around the entire blog hop for some GREAT inspiration!

EVERYTHING FESTIVE

Funny how your mind goes in a completely different direction once you have the elements laying out in front of you!  This card ended up with a diagonal stripe instead of vertical!


Stampin’ Details:

  • The base is 5-1/2 x 8-1/2 Gray Granite cardstock, scored at 4-1/4 and folded.
  • The bat Monster Bash Designer Paper was cut 4 x 5-1/4 and added to the base.
  • The 1 x 7 strip of Pumpkin Pie cardstock was laid diagonaly across the front, then trimmed off on each end.
  • The greeting from Everything Festive was inked with Pumpkin Pie and Basic Black Stampin’ Write Markers, then stamped on Whisper White cardstock.  It was cut with the largest Stitched Shape Oval.
  • The Oval was layered onto the next sized Scalloped Layering Oval cut from Basic Black cardstock.  It is added to the front with Stampin’ Dimensionals.
  • A small Rhinestone Jewel was colored with the Dark Cajun Craze Stampin’ Blends and added to the spider web.
  • Two Monster Bash Enamel Shapes were added to the Pumpkin Pie strip.

Isn’t that fun how it turned out?  Next up is a little sweet treat package!


SPOOKTACULAR BASH

This is a quick and easy treat package that holds a couple chocolate disks!

Stampin’ Details:

  • The spider web Monster Bash DSP was cut to 4-1/2 x 6,
    • With the 4-1/2 on top, score at 3/4  and 3.
    • With the 6 on top, score at 2, 2-3/4, 4-3/4 and 5-1/2
    • Cut flaps as shown below and adhere on tab and bottom flaps to form the box with fold-over piece on top.

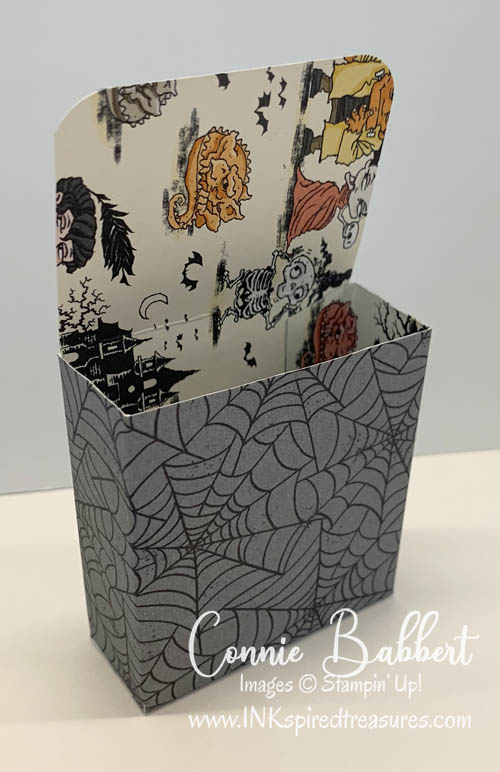
  • Fill box with candy and close with a Mini Glue Dot.
  • Wrap 8″ Black Glittered Ribbon around the candy package and tie closed with Night of Navy Baker’s twine, tied in a bow.
  • Cut the Ornate Frame Die background from Basic Black cardstock.
  • Stamp the greeting with Memento Black Ink on Pumpkin Pie cardstock, cut with Ornate Frame Die.  Layer on top of Basic Black Ornate Frame.
  • Color two small Rhinestones with Dark Cajun Craze Stampin’ Blends, add to each side of the Basic Black Ornate Frame.  Add label to package on top of ribbon (so ribbon can easily side of to get inside).
  • Cut one of the jars from the Monster Bash DSP and add to the front of the box.


I love how these turned out! And they were super simple to make, but would make a great gift for Halloween treats! OK…next up on the Control Freaks Blog Hop is Melissa Stout!  I know you’ll enjoy her projects, too!


Filed Under: 3D Projects, Cards Tagged With: #controlfreaks, #everythingfestive, #spooktacularbash, #stampinup, #tourdefreaks

I love stamping cards, altering 3D items and making little favors. I've been stamping for over 20 years and will have my 19th year Stampin' Up! anniversary in early May. I love being part of something that sparks my creativity and hear people comment, "you MADE this?" I also enjoy sharing that passion with others in my classes! If you live anywhere in the Delaware, Dublin, Powell, Lewis Center, Hilliard or surrounding Columbus, Ohio areas, join us! I love to meet new stamping friends. Email me for a current class schedule... I'm adding new classes all the time!

Reader Interactions

Leave a Reply Cancel reply

Your email address will not be published. Required fields are marked *

Primary Sidebar

Use HOST CODE: SW7NGG27


Ice cream, ice cream, we all scream for ice cream!  And, of course, popsicles, too!  For our latest Collection of tutorials, we are using the Sweet Ice Cream Stamp Set and Ice Cream Cone Builder Punch!  You’ll get SIX unique tutorials that include four cards (one a special fold), a treat box and a special 3D favor!   See more details HERE!


Stampin’ Up!’s FLOWERING CACTUS PRODUCT MEDLEY is a GREAT value and everywhere you look, cacti are featured as part of home décor!  We loved the whimsical cactus images and “punny” greetings in the stamp set, so just had to use it for our next Collection!  The Flowering Cactus Product Medley kit comes with stamps, dies, designer paper, felt flowers, and two colors of linen thread, everything you need to make it EASY to create!  You’ll get FOUR unique tutorials that include three cards (one a special fold), and a fun organizing project! See more details HERE!


Connie Babbert
Stampin’ Up! Demonstrator
Lewis Center, OH
614-371-8484


Subscribe to Blog via Email

Enter your email address to subscribe to this blog and receive notifications of new posts by email.

Archives

Categories

Disclaimer

As an independent Stampin’ Up! demonstrator, all of the content on this blog is my sole responsibility and the use of and content of the classes, services, or products offered is not endorsed by Stampin’ Up!

The contents of my blog are my own and ©Connie Babbert and as such may not be copied, sold, changed or used as your own for ANY magazines, contests, Stampin’ Up! events, swaps, profits or otherwise without my permission and is here solely for the purpose of inspiration, viewing pleasure and enjoyment. Thank you for understanding.

Content © Connie Babbert, All Rights Reserved. Genesis framework customized by WebsByAmy.com