Welcome to our Create with Stamping Friends Inspiration Monday challenges. This week’s inspiration challenge is a rustic cart filled with flowers!

FLOWER CART
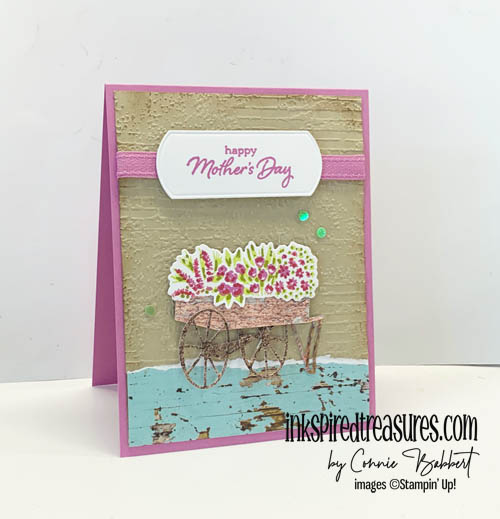
OK…what else could I use but the Flower Cart bundle? I gave it a rustic feel with the new Country Woods Designer Paper!
Stampin’ Details:
- The base is 4-1/4 x 11 Petunia Pop cardstock, scored at 5-1/2 and folded.
- The 4 x 5-1/4 layer of Crumb Cake was embossed with the Exposed Brick Embossing Folder and sponged along the edges with Crumb Cake Ink.
- A 1-1/2 x 4 piece of Country Woods Designer Paper was torn across the top and added to the bottom of the Crumb Cake layer.
- The wheels and crat from Flower Cart were cut from the Country Woods DSP (same sheet, I just reversed the crate paper and the wheel paper to give it two different patterns). They were added to the front with Stampin’ Dimensionals.
- The greenery was stamped with Lemon Lime Twist Ink on Basic White, then added accents with the Dark Old Olive Stampin’ Blends.
- The flowers were stamped with Petunia Pop Ink on the greenery, then some added accents with Light Cherry Cobbler Stampin’ Blends. It was cut with the Dies and added to the front with Stampin’ Dimensionals.
- The greeting from Flower Cart was stamped with Petunia Pop Ink on Basic White and cut with the Unbounded Love Die.
- A length of Petunia Pop Bordered Ribbon was added across the front and secured in the back, then the label added to the front with Stampin’ Dimensionals.
- A trio of green Iridescent Adhesive Backed Disks were added to the background.

Fun rustic cart, isn’t it? Those wheels really look rusty with that DSP. OK, check out Debbie’s Inspiration Monday card over on Create with Stamping Friends!

Supplies:
Stamps: Flower Cart
Inks: Lemon Lime Twist, Petunia Pop
Blends: Dark Old Olive, Light Cherry Cobbler
Cardstock: Basic White, Crumb Cake, Petunia Pop, Country Woods DSP
Accessories: Flower Cart Dies, Unbounded Love Dies, Exposed Brick Embossing Folder, Iridescent Adhesive Backed Disks, Adhesives

Be ready to deck the halls with Stampin' Up!'s HOME FOR CHRISTMAS BUNDLE featuring a cute gingerbread man, whimsical tree, holly, and peppermint images and dies! The HOME FOR CHRISTMAS DIES also include fun tag and pocket shapes, plus a scallop border! The classic greetings will finish your projects with some festive cheer. We've paired the HOME FOR CHRISTMAS BUNDLE with the TIMELESS CHRISTMAS 12x12 DESIGNER PAPER featuring traditional colors, plaids and stripes for your seasonal-themed crafts. Our HOME FOR CHRISTMAS COLLECTION gives you step-by-step tutorials for FOUR cards and TWO gift card holders for a total of SIX tutorials to use in your classes or personal use. See more details HERE!

How fun to create a traditional Christmas Village using Stampin' Up!'s WELCOME NOEL BUNDLE! Stamp the houses, trees and deer elements to build your holiday scene or cut them quickly with the detailed shapes and the WELCOME NOEL DIES. We used greetings from the Winter Adventures stamp set or use your own sentiments to finish it off. We've paired the WELCOME NOEL BUNDLE with the WINTER DREAMS 12x12 DESIGNER PAPER featuring white on deep blue designs for your winter-themed crafts. Our WELCOME NOEL COLLECTION gives you step-by-step tutorials for FOUR cards and TWO enhanced special fold card ideas for a total of SIX tutorials to use in your classes or personal use. See more details HERE!

Create the feel of a nature walk through the winter woods with Stampin' Up! FROSTED PINECONES BUNDLE! Stamp the pinecone and then add textured details using the FROSTED PINECONES DECORATIVE MASKS or cut the detailed shapes with the FROSTED PINECONES DIES. Add one of the heartfelt winter sentiments to finish it off. We've paired the FROSTED PINECONES BUNDLE with the WHISPERING WOODS 12x12 DESIGNER PAPER. Our FROSTED PINECONES COLLECTION gives you step-by-step tutorials for FOUR cards and TWO small decor ideas for a total of SIX tutorials, all full of seasonal charm. See more details HERE!


Leave a Reply