.png)
It's time for the November Tour de Freaks…brought to you by the Control Freak Swappers! We have quite a few members who have joined recently…a couple are on the tour today! We have a total of 13 stops for you. You can start here and go around the entire tour until you end back here! You've probably just come from the FABULOUS Wendy Weixler's blog! Didn't you love her projects? Our theme this month is Keep it Simple Stampers! The cards and projects that have minimal layers and are easily to duplicate!
Now…I don't think I normally make "hard" projects…but, I also don't think the majority of my projects are "simple", either! Either way, this Tour was a little bit of a stretch for me! I hope you enjoy my "Keep it Simple Stampers" projects! I have a snowman theme going on with Stampin' Up!'s Jolly Bingo Bits stamp set!
First up is a card that has been in my head for a while! It really was pretty simple and came together quickly. The hardest part was figuring out the layout of the circles…now I've done that for you!
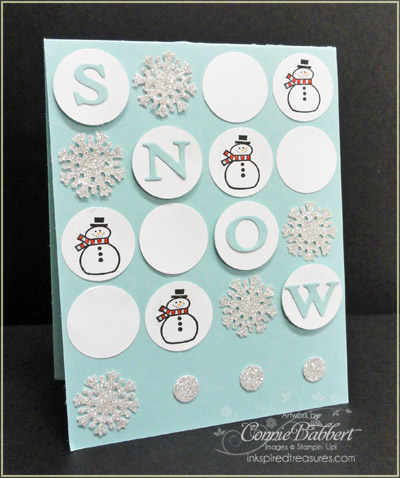
I started with a base of Pool Party cardstock. I stamped the little Snowman from Jolly Bingo Bits with Basic Black on Whisper White and punched them with the 1" Circle. I colored their scarves with Real Red and Pool Party and the nose added with Pumpkin Pie markers. I also punched 8 plain Whisper White 1" Circles, four of them I used the Naturally Serif Strip Die and cut out the letters of SNOW with Pool Party cardstock, they are popped up on the card with Stampin' Dimensionals. Then I used the Northern Frost Strip Die and cut out five of the smallest snowflakes with the Silver Glimmer Paper and adhered them! Finally, I punched out 3 of the Itty Bitty 3/8" Circles from the Silver Glimmer Paper.
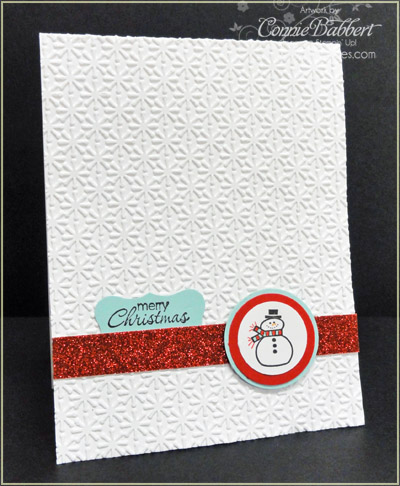
OK…this one is even simpler, but the Red Glimmer Paper packs a lot of WOW into it! I used Whisper White for my base card. I ran the front thru the Big Shot with the Snow Burst Impressions Folder. I added a strip of Red Glimmer Paper across the front. Then I stamped the snowman from Jolly Bingo Bits in Basic Black and colored the scarf and face again with Real Red and Pool Party Markers…and nose with Pumpkin Pie. I punched with the 1" Circle, layered it on the 1 1/4" circle of Real Red and a 1 3/8" Circle of Pool Party, then placed it with Stampin' Dimensionals on the Red Glimmer strip. I stamped Merry Christmas from Petite Pairs in Basic Black on Pool Party and punched with the Curly Label Punch, then cut it in half and tucked it in the top of the Red Glimmer Paper! That's it! Pretty simple, huh?
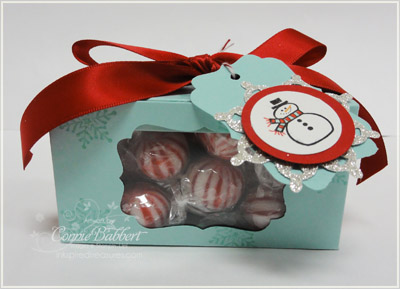
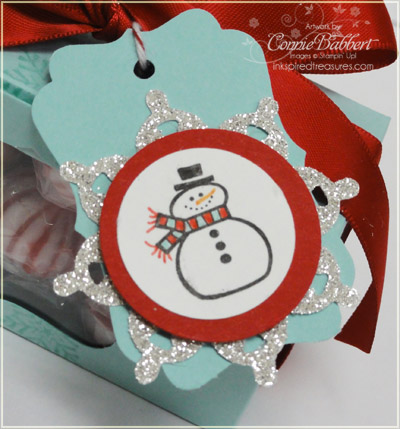
But wait…I had to have a matching box, right? So, I pulled out my faithful Box #2 Die. I cut it using Pool Party cardstock, then stamped all over it with the snowflake from Jolly Bingo Bits. I punched out the center with the Decorative Label Punch, then used that as a base for my tag! I used the Northern Frost Strip Die again and cut out one of the larger snowflakes with the Silver Glimmer Paper. I added another one of the snowmen punched with the 1" Circle punch and layered on 1 1/4" Real Red, then placed over the Silver Glimmer Snowflake with Stampin' Dimensionals. I added the snowflake to the front of the Decorative Label tag, punched a hole at the top with the Crop a Dile and attached it to the Real Red Satin Ribbon Bow with Cherry Cobbler Bakers Twine!
So, all three of my projects would be easily duplicated for Stamp Clubs, Workshops or Classes! Hope you enjoyed seeing them! Next stop is the AWESOME Mary Brown's blog!! She is the queen of Clean & Simple style, so I'm sure you will love her cards! Have fun taking the Tour de Freaks!
.png)

I really like the box with the tag. Very simple but pretty.TFS
I love your snow theme! Absolutely lovely!!!!
Love the snowman ensemble! So adorable!! Love the glimmer paper! It is such a great addition to simple projects! Thanks for the inspiration!
SO cute! I had to look twice at the little snowman! I have never looked very hard at the Bingo Bits set…I love what you did with it!
Oooh, I love the whole set! The colors are gorgeous and I love how you used that little snowman image! I always struggle when using a small image other than for a tag or a background… Very inspired! Love it 😀
TFS!
Cindy
Wonderful job with all of the projects. I especially like the Jolly Bingo Bits card – what a fun way to add in the snowflakes, etc!
Love the color combo Connie…great projects!
I just love how you used one simple little stamp and got so much mileage out of it and made it look so good! That is definitely a simple way to create!
Okay…just BRILLIANT featuring that ADORABLE little snowman! I LOVE all your projects…especially that SNOW card…just tooo cute! Have I mentioned how much I LOVE those little leaves 'sprinkling' down on your screen? ADORABLE!!!
LOVE the #2 box and tag! Super CUTE !
Susan B.
Love your color combo and stamp set!!! Love all the texture and sparkle!!! Great assortment!!! So cute!!! Love how you used the decorative label on your box and then used it for your tag!! Very Cute!!! I have to try that- great project to Demo!!! Lovely set!!!
I absolutely LOVE this color combo!! And your "snow" card is FANTASTIC! What a great layout!! Super-cute tag idea, too! 🙂
As usual, fabulous stuff! I've been having so much fun with your folded Christmas tree! Fun! Fun! Fun!
Thanks so much for sharing your goodies!
Eeeeek! That baby snowman is so dang cute! Some serious bang for your one inch stamp going on over here 🙂 Adore it all!
Wonderful job!! I really like this box.