Yeah! It is that time again…time to see what the fabulous Control Freaks are doing on their Tour de Freaks! You've probably just arrived from Melanie Schulenberg's blog! We have 12 blogs for you to visit this time. I'm sure you will love all the awesome projects you see as you tour. This month's theme is Christmas Gifts – small items, altered items, stocking stuffers, gift collections, and ornaments. I know I can't wait to see!

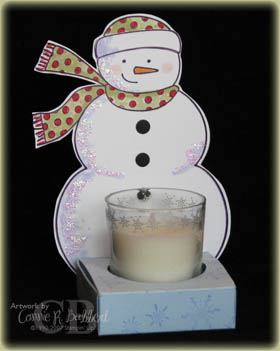
My first project brings back my favorite Stampin' Up! Simple Seasonal Thanks Snowman! This time he is standing behind a little candle votive. I stamped him in Basic Black on Whisper White and cut him out. I colored the shadows on his sides with the Bashful Blue Stampin' Write Marker and used the AquaPainter and Old Olive and Real Red Stampin' Write Markers for his hat and scarf. I colored his checks with the Blush Blossom and his nose with Pumpkin Pie. I added 3 Basic Black "buttons" on his from punched from the large hole of the Crop A Dile. I added a little Crystal Effects on his sides and Dazzling Diamonds glitter for a sparkly look!
.jpg) Can you guess what the base holding the votive is? Yes! The Sizzix Bigz XL Bitty Box! It is secured to the snowman along the back edge. I punched a 1 3/4 circle in the top to hold the votive and stamped Bashful Blue snowflakes from the Serene Snowflakes stamp set. The glass votive has silver Icicles Rub-ons decorating the rim. Now…this is for decorative purposes only. I wouldn't light a candle this close to paper. Wouldn't this be a fun little gift for a co-worker or friend?
Can you guess what the base holding the votive is? Yes! The Sizzix Bigz XL Bitty Box! It is secured to the snowman along the back edge. I punched a 1 3/4 circle in the top to hold the votive and stamped Bashful Blue snowflakes from the Serene Snowflakes stamp set. The glass votive has silver Icicles Rub-ons decorating the rim. Now…this is for decorative purposes only. I wouldn't light a candle this close to paper. Wouldn't this be a fun little gift for a co-worker or friend?

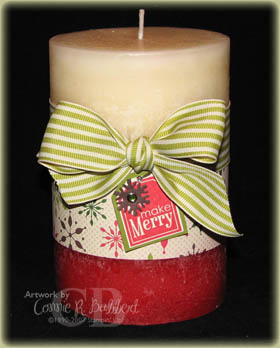
My next Christmas Gift is a large decorated candle. I found these nice two-tone vanilla/cranberry ones that smell SO good! They are about 3 inches in diameter. I wrapped some Merry Moments Designer Paper around the area where the two colors meet, then added a Old Olive Wide 1 1/4 Striped Ribbon. Hanging from the ribbon is the Make Merry tag from Stampin' Up!'s Grateful Greetings stamp set. It is stamped in Real Red on Very Vanilla card stock and punched with the small tag punch, then layered on a large Old Olive tag punch. Now…what snowflake punch did I use? The Merry Details Snowflake Die in Chocolate Chip card stock! I cut off the extra long "legs" of the snowflake to make it smaller and fit on my tag! The center is a Green Rhinestone Brad and it is tied to the bow with Silver Cord.

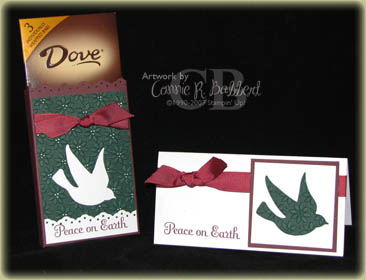
The next project is a Dove Chocolate Box Sleeve made from Bravo Burgundy card stock. Now…who wouldn't want a giant bar of chocolate as a gift! For the top layer, I ran the Handsome Hunter cardstock thru the Petals A Plenty Impressions Folder, then highlighted the centers with the White Gel Pen. I placed the Handsome Hunter Piece on the Dove Movers & Shapers die to cut it out, then backed it with Whisper White and wrapped it with Bravo Burgundy 5/8 Grosgrain Ribbon before putting it on the Dove box. I used the Eyelet Border punch across the top of the box, then cut a piece of Whisper White for the bottom, stamped Peace on Earth from Four the Holidays, and used the Eyelet Border punch again.
The 3×6 card fits in the Box sleeve with the Dove Chocolate perfectly. I used the extra Handsome Hunter die cut dove that was already embossed on the front, layered it on Bravo Burgundy and placed on the Whisper White card stock. The Bravo Burgundy Ribbon is wrapped around the entire front of the card. Peace on Earth from Four the Holidays is stamped with Bravo Burgundy Classic Ink. Thanks to my downline, Annette, for the inspiration on this project!
Whew…hope you enjoyed my projects! Come back later next week and I'll post the directions on making the Dove Chocolate Box Sleeve!
Next stop is the fabulous Mary Brown! I know you'll enjoy her projects!
.jpg)
