Wow…this really snuck up on me this month! I can't believe it is the 20th and time for the monthly Tour de Freaks, brought to you by the Control Freak Swappers! You've probably just come from the talented, FABULOUS Patty Bennett's blog!
Our theme this month was Sneak Peeks from the new Holiday Mini Catalog! I know my customers are already commenting on how much they LOVE this mini…I do, too, as my pocketbook will attest to….ouch! lol! I just had to have it ALL! I especially love a lot of the accessories in this mini…it is FULL of them. You'll notice a lot of them on my projects this month!

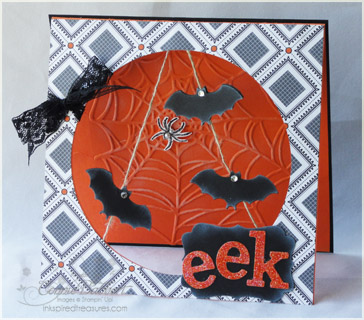
To begin, I have a Suspension Bat card! I had SO much fun making this one! It kind of evolved! I started with a base 5 1/4 x 5 1/4 card of Tangerine Tango. I added a 5 1/4 x 5 1/4 piece of Nite Owl Designer Paper (from the new mini) on the front. I used my Circle Scissors Plus to cut a 4" circle from the front thru both layers at the same time (if I were doing it again, I'd make it a little smaller…say 3 1/2). I ran the back half of the Tangerine Tango card stock thru the Big Shot with the Spider Web Impressions Folder…cool! Then I rubbed some White Craft Ink over the raised embossing with a sponge dauber. This base card was layered onto a 5 3/8 x 5 3/8 piece of Basic Black card stock for extra support.

Between the Tangerine Tango front and the Nite Owl Designer Paper, I added two strings of Linen Thread and pulled them tight between the layers, then adhered the layers together. I sandwiched two layers of the Bat Punch together with the Linen Thread in between…this makes it look like they are flying! I sponged White Craft around the edges of the bats and added a Rhinestone jewel to their heads. I wrapped some of the new 1/2 Raven Lace Trim into a bow in the upper left corner…love that stuff, too!

I stamped the spider from Stampin' Up!'s Dark & Dreary on Whisper White, colored it with the Basic Gray Marker and cut it out. I added two 1/2 backed pearls for the body…one smaller than the other. and placed it on the Spider Web with a Stampin' Dimensional. I used the new Decorative Label Punch with Basic Black Card stock, sponged around the edges with White Craft Ink. I cut EEK out of Tangerine Tango "glitter paper" with the Timeless Type Alphabet die and adhered to the front of the Label. Then I placed the label on the front of the card. (Note: to make glitter paper, apply Versamark to the card stock direct to paper, pour on Iridescent Ice EP, shake off excess, then heat set…makes glitter paper in every color that Stampin' Up! carries!) I LOVE my blinged out Suspension Bat card!
.jpg)
My second project was just as fun! It's a Bat Cone Candy Holder. It makes me LAUGH! I traced a bat pattern onto Basic Black card stock, cut it out, then ran it thru the Big Shot with the Texture Plates Kit #4. I had to run it thru a couple times to get the entire bat textured. I used the sponge dauber and White Craft Ink to go around the edges. I added Real Red Glimmer Brads for the eyes and drew the fangs with my White Gel Pen. I pulled it into a cone shape and secured in the back with Sticky Strip. I added a hanger with 1/2" Raven Lace Trim by piercing holes in the sides of the cone and tying knots inside the cone.

For the treat, I filled a small Cello Bag with Halloween colored M&Ms and tied it closed with a piece of the Raven Lace Trim. I added a tag made with the Dark & Dreary stamp, inked in Basic Black and stamped on Whisper White, then punched with the Decorative Label Punch. I added the 31 by stamping again on Real Red, then punching with the 1/2 circle punch and placing it on top with a Stampin' Dimensional. I also used a sponge dauber with Basic Black ink and sponged all the edges.
EDIT: As promised, here is the Bat Cone Candy Favor template to download!
Next on the Blog Tour is the wonderful Mary Brown! I KNOW her projects will be awesome as usual! Make sure to stop by and see all 11 stops on the Tour this month! Thanks for stopping by!
.jpg)
.jpg)
