
Wow! Another Saturday has rolled around! This month on Create with Connie and Mary blog hops, we are featuring “empowerment words”. Every Saturday we will have a new word that hopefully inspires the card we make. This week’s Saturday Blog Hop word is “Imagine”, maybe using a stamp set in a different way? Thinking out of the box! So, here’s what I did with the new stamp set and punch bundle, Under My Umbrella!
UNDER MY UMBRELLA
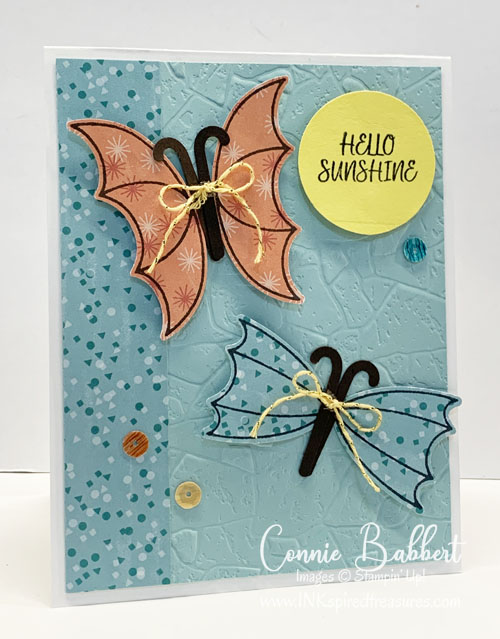
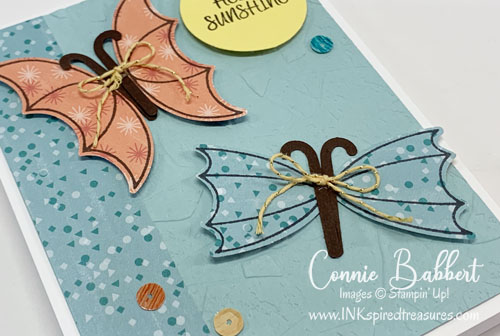
I had fun making punch art butterflies out of the umbrella tops and the bodies from the umbrella handle! The small prints in the Birthday Bonanza Designer Paper worked perfectly! Also, lots of other NEW products on here…can you spot them?
Stampin’ Details:
- The base is 4-1/4 x 11 Thick Whisper White cardstock, scored at 5-1/2 and folded.
- The 4 5-1/4 layer of Pool Party cardstock was embossed with the Stone Embossing Folder (I LOVE that folder…it is bundled with the Power of Hope stamp set for FREE with a $100 purchase).
- A 1 x 5-1/4 strip of Birthday Bonanza Designer Paper was added on the left side.
- The larger umbrella image was stamped twice with Memento Black Ink on the Calypso Coral print DSP and the smaller umbrella stamped twice on the Pool Party Print, then punched with the Umbrella Builder Punch.
- The handle was punched four times from Early Espresso cardstock.
- The two butterflies were assembled and added to the front with Stampin’ Dimensionals and the bodies with Tombow Multipurpose Glue.
- The “sun” was punched with the 1-1/2 Circle Punch from Pineapple Punch cardstock, stamped with Hello Sunshine from Under My Umbrella stamp set with Memento Black Ink, and added on front with Stampin’ Dimensionals.
- The Metallic Baker’s Twine (another FREE Sale-a-Bration with $50 purchase) was tied in a bow and added to the bodies with Mini Glue Dots.
- A trio of Sequins from the SAB Twine/Sequin package were added in the background.
I am SO happy with how this turned out and feel I really used the power word “imagine”, don’t you? OK…next up on our blog hop is our Create with Connie and Mary website, then on to creative Mary Brown, or head backwards to see Melissa’s fabulous card! See what everyone did with this challenge!


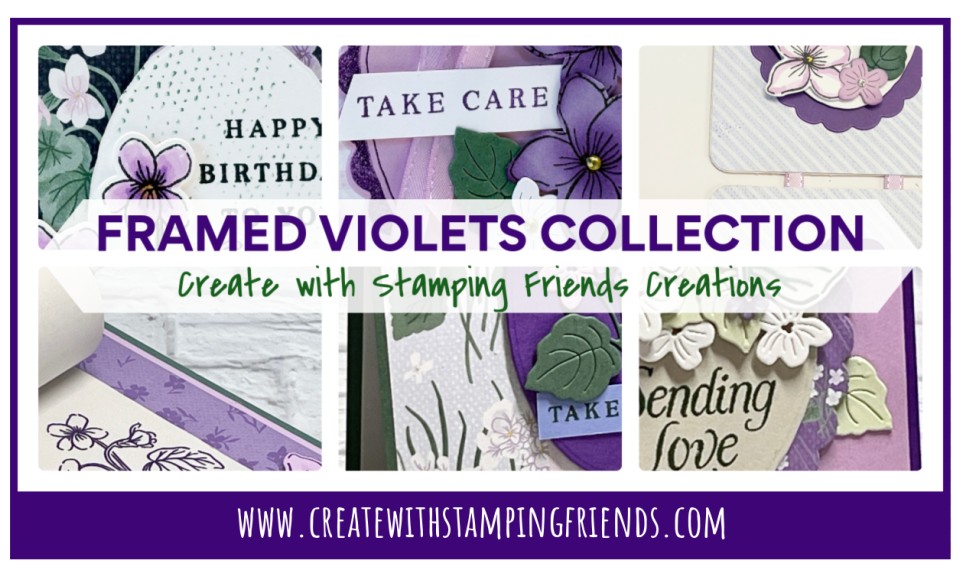
Stamp a bunch of violets quickly with the line-drawn images in Stampin' Up!'s FRAMED VIOLETS BUNDLE (available for customers beginning July 1st). Layer them together easily and add a die-cut oval, some accent florals and leaves for extra texture and subtle details. Everyday greetings give a finished level of polish. We've combined the FRAMED VIOLETS BUNDLE and the VIOLET DREAMS 12x12 DESIGNER PAPER for an eye-catching cohesive look! You'll get SIX step-by-step tutorials for FOUR regular cards and TWO small 3D projects in our FRAMED VIOLETS COLLECTION! See more details HERE!
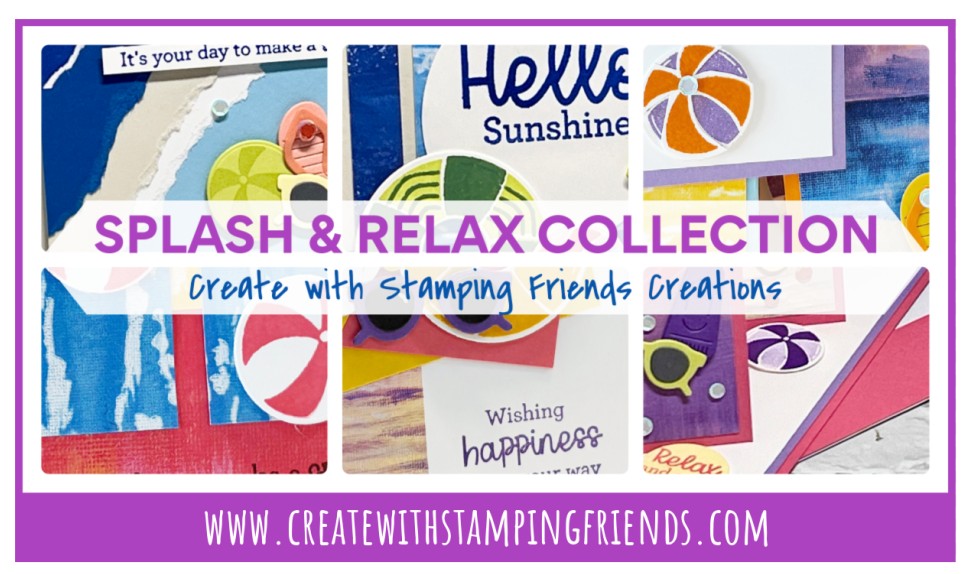
Grab those easy, breezy beach vibes right at your craft table when you use Stampin' Up!'s SPLASH & RELAX BUNDLE of products! Be inspired by the innertubes, beach balls, sunglasses, and other beach accessories this cute set has to offer! Then add a fun, carefree sentiment to finish off your project! We've combined the SPLASH & RELAX BUNDLE and the SCENIC COAST 6x6 DESIGNER PAPER with its' bright color backgrounds!! You'll get SIX step-by-step tutorials for FOUR regular cards and TWO special fold cards in this Collection! See more details HERE!

Inspired by the delicate charm of lilies of the valley flowers, this VALLEY IN BLOOM SUITE of projects will bring timeless beauty to your crafting! These products have versatile florals, textures and shimmer that will have you grabbing them to use all year long. We've combined the LILY OF THE VALLEY BUNDLE and the VALLEY IN BLOOM 12x12 DESIGNER PAPER with patterns that add whimsy and personality. You'll get step-by-step tutorials for EIGHT cards in this Collection! See more details HERE!

What a great idea! I just ordered this set…can’t wait to try your card. TFS
Thank you for this idea! I just made it my own with the new stamp set Pretty Parasol. <3