Welcome! Since I used Watercolor Winter stamp set for my card set this week on Create with Connie and Mary Card "Create"tions, I thought I'd share a simple coordinating favor with everyone using Watercolor Winter. The rest of our Card "Create"tions Design Team is also sharing their matching favors with you over on Create with Connie and Mary, so make sure to check them out.
I used a simple Sour Cream Container, but jazzed it up by using Designer Paper and the Watercolor Winter images. Now, I've tried to get a good photo, but do you know how hard it is with a 3 sided favor? lo!
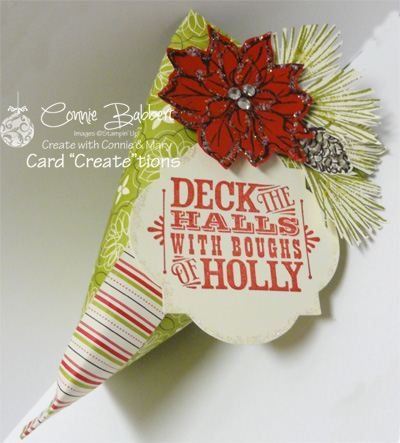
Here are the details!
- I used a 5 x 6 square of the green print from Candlelight Christmas Designer Paper and adhered a 3/4" stripe pattern of the same package down the center.
- I rolled it into a long tube (6" long), and adhered with Sticky Strip.
- One end I added Sticky Strip inside the opening and folded in the one direction. I scored the bottom several times in 1/8" increments to "crimp".
- Fill with candy or whatever, then add Sticky Strip to the other end and fold it closed in the other direction to form the sour cream package shape. I scored that end several times 1/8" apart to crimp it, too.
- I stamped the Poinsettia with Early Espresso on Real Red, then cut it out.
- I two-step stamped the pine cone with Early Espresso and the pine needles with Lucky Limeade on scrap Very Vanilla and cut them out.
- Adhere the images to the top of the sour cream container.
- Stamp Deck the Halls from Merry & Type in Real Red on Very Vanilla, cut with the second from smallest Window Frame Framelit.
- I applied Dazzling Details glitter around all the edges of the stamped images so they sparkle!
- I also added a trio of Rhinestones inside the Poinsettia.
This was pretty quick and easy to make…would be fun to hang them from the tree as a little favor at your holiday parties.
******************
And…don't forget! We've just started our Christmas/Winter Card "Create"tions Edition! Join us for our newest session featuring only cards! With the set of 3 cards I featured AND this cute sour cream container, you have a class all ready to go!

- These cards are EXCLUSIVE to our subscription and won't be shown anywhere else.
- 3 week mini-edition that is only cards, October 28 – November 17
- Each designer will choose a holiday or winter set each week and make 3 different cards using that one set.
- Total of 45 unique card ideas from 15 different sets.
- Each card set includes a printable supply list with card measurements and photos.
- Perfect for your classes and stamp camps or to make for your own holiday cards!
AND…as a bonus on Saturdays, each designer will be sharing a little 3D favor that matches the holiday or winter set they chose that week. We will be sharing this favor on our personal blogs, too, but you can easily tie it into your class offering!
Check out the FREE previews on Create with Connie and Mary!

Loving all the layers on your goodie Connie. I like how you layered all your elements and jazzed up the flower!
Love the festive sour cream container! These are so easy and a great little favor! I need to remember to use this idea more often! Great job on the fussy cutting! Looks awesome!!
This sour cream container is GORGEOUS! The touch of glitter to the edges of the pointsettia looks like snow glistening in the sunlight–it's magic. Smiles, Elizabeth
Connie, your card is beautiful. I just got this set so I'm excited to try this out. It's been years since I've made one of these sour cream containers.
This is sooo fun…almost looks as though you plucked the container off of a Christmas tree! Thank you for sharing the tutorial!