
Happy Saturday! This week’s blog hop theme is “Christmas Favors”. This week’s theme is another one of my favorites because I love getting new ideas that I can use for small gifts for neighbors and friends! I picked up these cute little “Berry Pretty” Christmas lotions on sale at Ulta because of the Blackberry Bliss color, and created this little box to hold them! A bonus is that the lotion smells REALLY good!


Stampin’ Details:
- The base is TWO 2-3/4 x 8-1/2 piece of Blackberry Bliss cardstock.
- With 8-1/2″ at top of Simply Scored Tool, score at 2″ on both pieces.
- Overlap and adhere the scored pieces to form the bottom of the box sleeve.
- The lotion holder is 2-3/4 x 3 Blackberry Bliss.
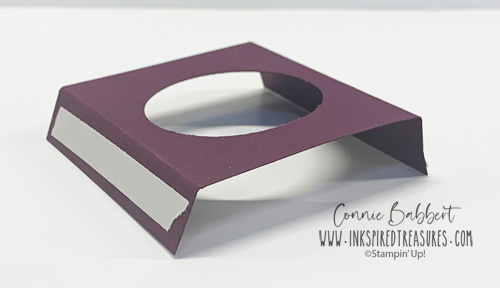
- With the 3″ at the top of the Simply Scored, score at 1/2 and 2-1/2.
- Punch a 1-1/2″ Circle in the center (or the size of your lotion cap).
- Add Tear & Tape to each tab, then line up edges with the score lines on the base sleeves.
- Place lotion inside and secure in place with a small piece of Tear & Tape on the back.

- Add 2-1/2 x 6 piece of Plaid Tidings Designer Paper to the front sleeve (line up at top, it will be slightly short but the greeting will hide it.)
- Punch a 1/4″ hole at the top thru both sleeve layers.
- Tie 16″ of Snowflake Splendor Shimmer Ribbon in a bow to hold the sleeves closed
- Poinsettia:
- Cut/Emboss three sizes of petals from Melon Mambo cardstock with Poinsettia Dies, adhere together with Mini Glue Dots. Add to front with Stampin’ Dimensionals.
- Stamp two large and two small leaves from Poinsettia Petals Stamp Set with Mossy Meadow Ink, cut with Poinsettia Dies, adhere under poinsettia with Stampin’ Dimensionals.
- Stamp two seed pods from Poinsettia Petals Stamp Set with Blackberry Bliss Ink, color the seed head with Melon Mambo Blends, cut with Poinsettia Dies, then tuck under poinsettia.
- Cut two sprigs from Brushed Metallic Gold Paper with Poinsettia Dies, tuck under poinsettia on top of leaves.
- Add a Beaded Pearl to the center.
- Stamp Warm Wishes greeting from Poinsettia Petals stamp set with Blackberry Bliss Ink on 3/4 x 2-3/4 piece of Melon Mambo cardstock, adhere at the bottom.
I LOVE that Plaid Tidings Paper…think I’d better stock up with another package! OK, next up on our blog hop is our Create with Connie and Mary website, then on to creative Mary Brown, or head backwards to see Brenda Nelson’s fabulous card and see what everyone did with this challenge!


Ghosts and bats and cats, oh my! The OH MY FRIGHT COLLECTION will kick off your Halloween season with sweet and spooky images! Create layers of scary fun with a twisted tree and add cats, bats, a spiderweb, a witch's hat and other accessories to decorate your cards, tags, scrapbook pages and other crafty projects! Finish with a playful Halloween greeting! We've combined the OH MY FRIGHT BUNDLE and the magical patterns in the FRIGHTFULLY FUN 12x12 DESIGNER PAPER! You'll get step-by-step tutorials for FOUR cards and TWO decorated White Gable Box ideas in our OH MY FRIGHT COLLECTION! See more details HERE!

The SIMPLY LEAVES PUNCH BUNDLE can be used for ANY season! Follow our card journey through Spring, Summer, Fall and Winter using this versatile stamp set and punch! The patterned leaves will add natural detail and texture on your cards and projects, then add one of the simple greetings to finish. We've combined the SIMPLY LEAVES PUNCH BUNDLE and the garden neutral patterns in the VALLEY OF BLOOM 12x12 DESIGNER PAPER! You'll get step-by-step tutorials for EIGHT cards...two card ideas from each season...in our SIMPLY LEAVES CARD COLLECTION! See more details HERE!

Create wonderful dimensional poinsettias in a variety of sizes with the PRETTY POINSETTIA BUNDLE! The dies cut and emboss at the same time for lots of detail and texture. The coordinating stamp images add fun seasonal greetings, sprigs and other festive touches to your cards and projects. We've combined the PRETTY POINSETTIA BUNDLE and the A STITCHED SEASON 12x12 DESIGNER PAPER for a traditional holiday look you'll love! You'll get step-by-step tutorials for SIX projects...FOUR cards and TWO favors in our PRETTY POINSETTIA COLLECTION! See more details HERE!

I absolutely love your lotion holder! I saved it on my Pinterest board and look forward to creating some for friends and family. Thank You!