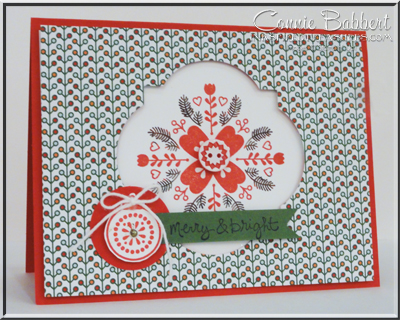
I think this pattern in Nordic Noel is a little busy, so I struggled with how to use it with the Cheerful Christmas stamp set. I ended up cutting out the Window Frame Framelit from the center and went from there! I do like how it turned out!
Here are the details:
- The base is 5 1/2 x 8 1/2 Real Red, folded in half.
- I cut the Window Frame Framelit from the middle of a 4 x 5 1/4 piece of Nordic Noel Designer Paper.
- On a 3 3/4 x 5 piece of Whisper White, the medallion image from Cheerful Christmas was inked with Real Red, then a Garden Green Marker was used on the pine needles and then stamped.
- The stamped Whisper White image was placed on the front of the Real Red, then the Designer Paper was added to the front with Stampin’ Dimensionals to make it raised above the stamped image.
- In the center of the medallion is a Nordic Button.
- The round ornament image was stamped with Real Red on Whisper White and cut out. It was layered on a 1 3/8″ punched Circle of Real Red. At the top, a bow from White Bakers Twine was added, and a Rhinestone Jewel was placed in the center.
- Merry & Bright from the FREE Hostess Set, Good Greetings (special ends this month!), was stamped with Tuxedo Black Ink on a strip of Garden Green, cut with a flag end and added between the ornament and the circle on the front of the card!
I ended up loving this layout and will definitely use it again!
 We have just begun our Week 3 of the Holiday Collections 2014 over on Create with Connie and Mary and it’s not too late to join! Don’t miss out on joining us for some FABULOUS ideas using Christmas and Winter stamp sets in the Holiday Catalog! For only $29.95 US, you’ll get over 24 project tutorials with full directions and photos!


Your card is very cheerful and pretty!
Oooh this is gorgeous, Connie! You’ve truly captured the Nordic feel of these products.
Thank you for all your creativity shares. I always look forward to your posts.