• Create with Connie and Mary
  • Clearance Rack Deals!
  • Tutorials for Sale
  • Skip to primary navigation
  • Skip to main content
  • Skip to primary sidebar

Inkspired Treasures

Connie Babbert, Stampin Up! Demonstrator

  • Home
  • Events
  • Shop My Online Store
  • Latest Catalogs
  • Join My Team
    • Sign Up!
  • Show Search
Hide Search

Control Freaks Sept 2016 Happy Fall

September 19, 2016 By Connie | 8 Comments

freakwelcome2013
It’s time for this month’s Tour de Freaks blog hop!  This month we are featuring Happy Fall Y’all…and that includes Halloween!  You’ve probably just come from Wendy Weixler’s fabulous blog…love her projects!  If you are arriving prior to September 20th, not all links may be working yet!


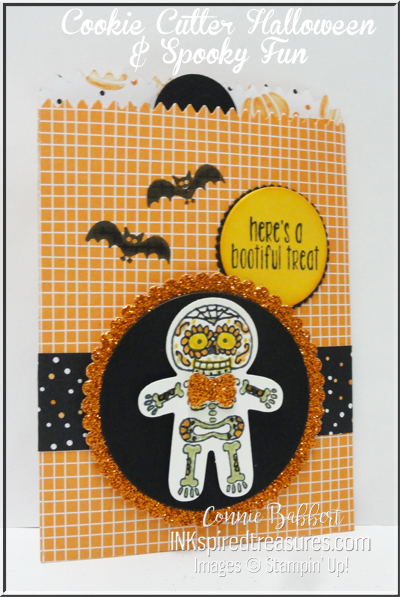
So, who doesn’t adore the Cookie Cutter Halloween stamp set?  I’ve done a series of different cards using these fun images on my blog!  Here’s the latest one!  I was at World Market over the weekend and they had tons of sugar skulls and decorations!  It put me in mind of the skeleton in Cookie Cutter Halloween.  Then this weekend someone else on Facebook I saw had the same idea!  Too funny.  But, here’s my rendition of a sugar skeleton using the fun Mini Treat Bag Thinlet and Cookie Cutter Halloween and Spooky Fun stamp sets.


sept-2016-cookie-cutter-halloween-3
 

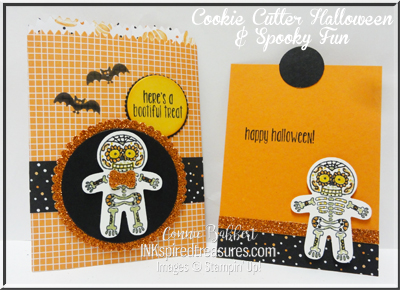
Here it is opened up with a “card” inside.


sept-2016-cookie-cutter-halloween
 

Since I was babysitting my grandkids today, I didn’t know if I’d have time, but at the last minute, I decided to do a little coordinating treat holder.  I used two of the smaller sections of the Mini Treat Bag Thinlet in order to get a skinny treat bag!  I also cut it down in size so it fit one of the smaller Hershey Mini Bars!


sept-2016-cookie-cutter-halloween-4
Here are the details:

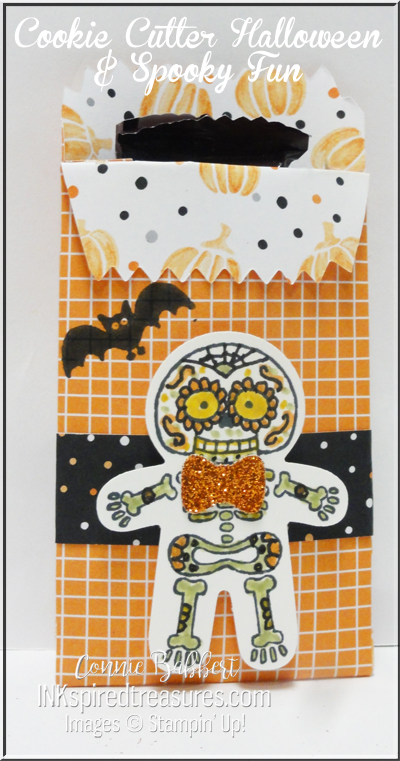
  • The Mini Treat Bag base is cut from the plaid print in Halloween Night Designer Series Paper package and put together with Tear and Tape Adhesive.
  •   A 1-1/2 x 8-1/2 belly band of coordinating DSP is around around the bag.
  • A scallop circle is cut from Pumpkin Pie Glimmer Paper with the Layering Circles Framelits and a Basic Black circle was cut to fit inside.  They are popped up on the front of the bag with Stampin’ Dimensionals.
  • The skeleton from Cookie Cutter Christmas was stamped with Memento Black Ink, the colored with Pumpkin Pie, Crushed Curry, Pear Pizazz and Basic Black Markers, adding swirls and designs like the sugar skulls.  It was punched with the Cookie Cutter Builder Punch and adhered on front with Stampin’ Dimensionals.
  • A bow tie was punched from Pumpkin Pie Glimmer Paper and added to the neck with a Mini Glue Dot.
  • The greeting was stamped with Memento Black Ink on Crushed Curry and cut with the Layering Circles Framelits, then sponged around the edges with Pumpkin Pie and added to the scallop Basic Black circle on the front.
  • The bats were stamped directly on the DSP with Memento Black Ink.
  • Inside, the Pumpkin Pie cardstock had a 3/4 x 3-3/4 strip of DSP to the bottom, with a 1/4″ strip of Pumpkin Pie Glimmer Paper added on top.
  • Happy Halloween from Spooky Fun was added with Memento Black Ink, and a second sugar skeleton was added to the bottom!
  • A smaller Basic Black circle was cut to use as the pull-up tab at the top.


OK…next up is Cindy Elam, I know you will LOVE her projects, then continue on around the tour until you complete the tour and are back here!  I’m sure you’ll get lots of great ideas from my fellow Control Freak Swappers!


clickhere2013-1


Save

Save

Save

Save

Save

Save

Filed Under: Cards, Tour de Freaks Tagged With: #inkspiredtreasures, #stampinup, Cutter Cutter Halloween, Spooky Fun, Stampin' Up!, Sugar Skull Skeleton

I love stamping cards, altering 3D items and making little favors. I've been stamping for over 18 years and had my 17 year Stampin' Up! anniversary in early May. I love being part of something that sparks my creativity and hear people comment, "you MADE this?" I also enjoy sharing that passion with others in my classes! If you live anywhere in the Delaware, Dublin, Powell, Lewis Center, Hilliard or surrounding Columbus, Ohio areas, join us! I love to meet new stamping friends. Email me for a current class schedule... I'm adding new classes all the time!

Reader Interactions

Comments

  1. melissa davies says

    September 19, 2016 at 9:05 pm

    Those are the most adorable skeletons I have ever seen! Never know where you are gonna find inspiration! Love them!

  2. Amy Koenders says

    September 19, 2016 at 9:11 pm

    Oh my goodness, how cute are those little bags! Perfect for Halloween. Great colors and design. 🙂

  3. Debbie Henderson says

    September 20, 2016 at 4:55 am

    I can’t believe you got these done while babysitting. Great job on both project. So cute!

  4. Cynthia Ferenz says

    September 20, 2016 at 9:50 am

    Too, too cute! Love the doodling on him. TFS!

  5. Kelly Acheson says

    September 20, 2016 at 10:30 am

    These are adorable! Thanks so much for sharing!

  6. Cindy Elam says

    September 20, 2016 at 5:38 pm

    Sugar skeletons?! What a brilliant idea!!! These are so cute, I wish I had littles again, just so I could make them.

  7. Heidi Baks says

    September 21, 2016 at 8:43 am

    I love how you decorated the skeleton to be a Day of the Dead character – that is great!

  8. Lacey Vaughan says

    September 29, 2016 at 8:06 pm

    This is so cute. You are tge only person beside myself to do this. I have one project in my blog if yiu want to see what I did. Yours is very cute!

Leave a Reply Cancel reply

Your email address will not be published. Required fields are marked *

Primary Sidebar

Craft Fair Items for Sale!

I have a few items for sale left over from my craft fair that are great for stocking stuffers, neighbors, teachers or friends!  See all the details here!


We created a new Gifts of Good Taste Collection with SIX packaging ideas along with our favorite (and easy!) holiday cookie and candy recipes! It is so nice to give special hand-made little gifts to co-workers, neighbors, your mailperson and UPS drivers! We’ve used a variety of Holiday Catalog Stamp Set and Dies for our decorating ideas, but you could mix the packaging up with the stamps and dies you already own…the recipe and package design is what is most important! This Gifts of Good Taste Collection has step-by-step picture tutorials featuring SIX gift packaging ideas using Stampin’ Up! products with corresponding recipes you can quickly make up and give away! See more details here!


Connie Babbert
Stampin’ Up! Demonstrator
Lewis Center, OH
614-371-8484

Subscribe to Blog via Email

Enter your email address to subscribe to this blog and receive notifications of new posts by email.

Archives

Categories

Disclaimer

As an independent Stampin’ Up! demonstrator, all of the content on this blog is my sole responsibility and the use of and content of the classes, services, or products offered is not endorsed by Stampin’ Up!

The contents of my blog are my own and ©Connie Babbert and as such may not be copied, sold, changed or used as your own for ANY magazines, contests, Stampin’ Up! events, swaps, profits or otherwise without my permission and is here solely for the purpose of inspiration, viewing pleasure and enjoyment. Thank you for understanding.

Content © Connie Babbert, All Rights Reserved. Genesis framework customized by WebsByAmy.com