 It’s time again for the Tour de Freaks! Our theme this month is “Love is in the Air”…very appropriate for Valentine’s Day that is coming up soon! You’ve probably just come from Wendy Weixler’s blog, her projects are darling, aren’t they? Click at the bottom to continue around the tour…there are 11 stops this time.
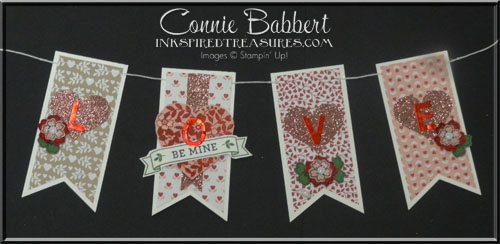
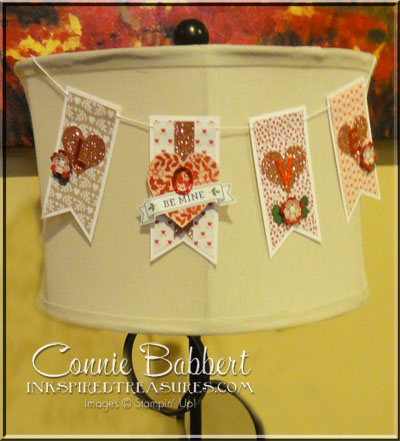
I chose to use Love Blossoms Suite of products for my projects since they are definitely great colors for Valentine’s Day. I’ve been wanting to do a little banner for my lamp shade. The lamp sits on a table that is visible when my customers come down the stairs and I try to change out the tablescape each holiday. Here’s a closeup.

Here it is draped on the lamp shade (sorry I can’t show you the entire Valentine tablescape…it is so cute, but it has some private class items on it!)
- The Thick Whisper White background on the banners is 2 x 4-1/4, punched with the Triple Banner Punch. The Love Blossoms layer on top is 1-3/4 x 4, punched with the Triple Banner Punch, then adhered together with the White Baker’s Twine sandwiched between the two layers.
- On three of the banners, Blushing Bride Glimmer Paper was punched with the Sweetheart Punch and the Little Letters Thinlet Dies “L, V, and E” were die-cut from Red Metallic Paper and adhered with Tombow Multipurpose Glue to the Glimmer Paper hearts.
- On the fourth banner, a 3/4 x 3-3/4 strip of Glimmer Paper was punched with the Triple Banner Punch and adhered down the center. The heart from Bloomin’ Love stamp set was stamped with Real Red on Blushing Bride cardstock and hand-cut. Over top the Be Mine was stamped with Tuxedo Black Ink in the center of the Garden Green banner and hand-cut. It was placed on the banner with Stampin’ Dimensionals. Plus, the letter “O” from the Red Metallic Paper was added on the banner.
- Three of the larger outline flowers were stamped with Tuxedo Black on Real Red and three of the smaller outline flowers were stamped with Tuxedo Black on Blushing Bride. The larger outline flower was also stamped twice more with Tuxedo Black on Garden Green and the petals cut to form leaves on three of the banners.
- Small flowers were added to the larger flowers with Mini Glue Dots, and the leaves tucked under them. Perfect White Accents were added to the center of the flowers.
- The Clear Wink of Stella was added to all the petals for lots of shimmer!
That’s it for the banner! The leftover piece of 2 x 3-1/2 Red Metallic Paper that I cut out the letters, I used for my card.

- The base card is 4-1/4 x 11 Real Red, folded in half.
- A 4 x 5-1/2 layer of Whisper White was added to the top.
- A 2 x 3-3/4 strip of Blushing Bride Glimmer Paper was added on the left side.
- The Red Metallic Love was adhered to a 2-1/2 x 4 piece of Love Blossoms Designer Paper with Stampin’ Dimensionals, then adhered to the cardfront.
- The heart from Bloomin’ Love was stamped with Real Red on Blushing Bride and hand-cut.
- The large outline flower was stamped with Real Red on Whisper White and cut out, the small outline flower was stamped with Real Red on Blushing Bride and adhered together with a Perfect White Accent in the center.
Lots of shine and glimmer on here!
OK…next stop is the fabulous Cindy Elam! You’ll love her projects, I’m sure! Then just continue on around the tour!


Connie, I am not “into” banners at all, but your lampshade banner is totally something I could love!!! Thanks for the inspiration! (Now if I could keep the kitten from being too interested…..) 🙂
I love how you used the little letters and the negative (on the card)! Beautiful banner! Would love to see what other beauties are on the table! 😉
The cut out LOVE is a great idea.
Darling banner! Love that you included the the “leftovers” in your card – can’t throw anything away!
You really rocked the love theme with both of these super-pretty projects!