.jpg)
I'm so glad you decided to drop by and see the January Tour de Freaks brought to you by the fabulous Control Freaks! You've probably just arrived from Melanie Schulenberg's blog! We have 16 blogs for you to visit this time. I'm sure you will love all the awesome projects you see as you tour. This month's theme is Valentine's and LOVE. I know I can't wait to see what these fabulous designers have come up with! To continue the tour, click on Mary Brown's link at the bottom of this post.
 First up is a 5 1/2 x 5 1/2 card using the beautiful Sending Love Designer Paper…did you know that EACH sheet glitters? It is so sparkly in person! I started with a base of Pretty in Pink cardstock and added the small floral pattern from Sending Love. I added a band of Pretty in Pink, punched on both sides with the Pinking Hearts Border Punch. Layered inside is a strip of Real Red cardstock. I stamped Happy Valentine's Day from Teeny Tiny Wishes in Chocolate Chip under the 6/8 Pretty in Pink Satin Ribbon. I used the Scallop Heart of Hearts Embosslit with Very Vanilla and Pretty in Pink cardstock and placed them on the right, then added a Real Red heart punched from Heart to Heart Punch and a Real Red Epoxy Brad. But wait…what's INSIDE is all the FUN!
 INSIDE I used the Simple Birthday Thanks cupcake and stamped the bottom in Basic Brown on the small floral pattern from Sending Love and cut it out. I scored it every 1/4 inch and pleated it to form the cupcake liner. I stamped the top on Pretty in Pink and cut it out. I adhered the base to the top. Then I punched LOTS of the medium sized hearts from Heart to Heart punch with the glittery pink floral pattern in Sending Love and placed them randomly on the Pretty in Pink base for the frosting. I punched the small heart from the same punch in Real Red and placed them as "sprinkles" on the frosting. I punched the long heart from the Red Pattern Designer paper for the "cherry" and added a Chocolate Chip cardstock stem.
 I cut the pop-up piece in the Pretty in Pink along the bottom and adhered the LOVE cupcake to the front of it. I added the red heart flower pattern Sending Love Designer Paper in the background of the top and a strip along the bottom. I added more stamped hearts from I {Heart} Hearts, the Scallop Heart of Hearts and punched Heart to Heart pieces. Finally, I stamped Love You Much from Well Scripted stamp set in the Occasions Mini in Real Red Classic Ink. I LOVE how this turned out!
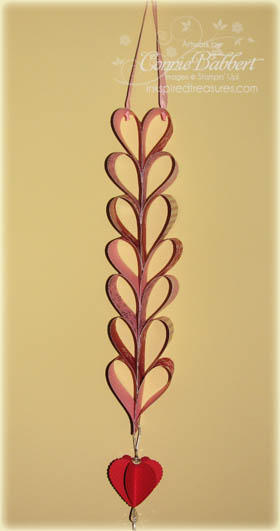 OK…my next project was VERY fun to make! I'll put up a tutorial on how to make it in the next few days! Here I made hearts from the Sending Love Designer Paper patterns and adhered them together. At the bottom, I used the Crop A Dile and set a Silver Eyelet. I added a little ornament made with six Scallop Hearts, scored in half, and adhered together. I did use the Silver Cord (from the Holiday Edition) to form a loop and added some crystal beads from the Pretties Kit at the top and bottom. At the very top of the wall hanging, I added two more silver eyelets, then added a loop of Pretty in Pink Taffeta Ribbon so it is easy to hang. Again, I was SO happy with how this turned out! Even my husband said, "That's really cute!"


Well, I hope you've enjoyed my contribution to the Tour de Freaks this month! Now it's time to move on to Mary Brown! Enjoy the rest of the tour!
.jpg)

Hi, Connie
Love the pink heart-covered cupcake inside your card – so cute!
That cupcake card ROCKS – love it!!
Shut UP!! I totally can't STAND it!! A pop-up cupcake!! AND your heart-a-licious wall hanging is just AWESOME!! You are amazing, girl!! 🙂
Loving that paper chain of hearts! Beautiful.
The hanging hearts are too cute. Great idea.
love your projects. the crimper also works well for the cupcake paper.
your hanging hearts is adorable.
thanx for another great tour.
xox ~ carol.
WOW…your projects are oh so fabulous!!! LOVE the heart hang! SOOO CUTE
These are AWESOME! Very original! TFS!
xo B.
Very cool projects – love them both!!
WOWZER! I love coming to your blog. Always something neat to see and something to get my creative juices flowing.
Love the hanging hearts!!! How clever! Great job.
Oh…my…gosh…are these the cutest projects or what?!? That hanging heart project is so adorable and clever. If you got a "cute" from your hubby that's high praise indeed…I usually just get a grunt! 🙂
SHA-ZAM!!! Oh my goodness! I love both your projects…the cupcake inside the card…yummy!! Can't wait to see the directions to make the hanging hearts, so I can make one for me! Erin Blair
I truly love your heart mobile! So sweet & beautiful too. Very creative!
And your pop-up cupcake card – wow!
Love your creations. I'll keep checking for the tutorial for the wall hanging.
LOVE THE VALENTINE MOBILE!! So very pretty and clever! Great pop up cupcake too. So much fun eye candy here!
The pop up cupcake is so much fun! I also love your ornament decoration.
Wonderful valentine projects, Connie! Love the basket full of "love" and the heart on your mobile. Really great ideas! You're inspiring!
Wow those are awesome projects. I love that paper and I am not a girly girl, but something about this paper is wonderful. Great job!
I love the Tour and look at it every month. The cupcake has to be the cutest project in all of them for this month. It is folllowed in a close second by the hanging heart!! Now I have to make both of them. Thanks for the wonderful inspiration. You Rock!!
Carey
aka Roscoe's mommy
Wow, those projects are so creative and clever – great job! 🙂
Love your hanging hearts. Can't wait to see how you put it together.
Love your projects! Very clever!
I love the hanging hearts mobile, Connie! It is so original and creative! I think I will have to make one to hang from our light over the table.
Sue
Wow! Love, love, love your projects! Thanks, Connie!
Love all your ideas! Especially love your name 😉
Love the hanging heart design – will have to case!!!!! Yvonne Walker
I love that pop-up card! It is wonderful! Great job.
My friend Carol sent me this link, WOW, great projects! Love, Love, Love the cupcake. Beautiful Blog too!