Yep…another card done with Stampin’ Up!’s Jar of Haunts stamp set! I was glad to see a regular pumpkin in this set, and I’m sure I’ll be using it a lot for fall cards…we have a lot of fall birthdays. And…although I LOVE the jars, there is a lot more you can do with this set! You may have noticed my new blog look with the stack of pumpkins…combining the two was my inspiration for this card! BUT…check back tomorrow for ANOTHER twist with this set!
Here are the details…
- The base is 5-1/2 x 8-1/2 Thick Whisper White folded in half.
- Along the bottom of the 4 x 5-1/4 layer of Smoky Slate is a 1 x 5-1/4 layer of Halloween Night Designer Paper.
- The Smoky Slate/Basic Black Baker’s Twine is wrapped around twice and tied in a bow on the front.
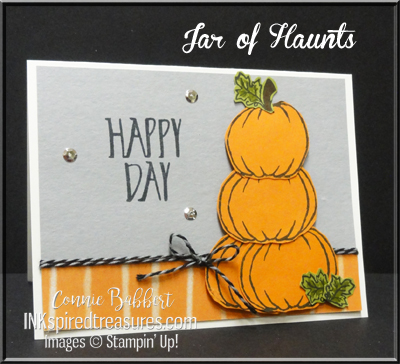
- Happy Day from Perfectly Wrapped is stamped with Memento Black Ink in the upper left area.
- But…how did I make the different sized pumpkins from just ONE stamp??? First stamp four pumpkins with Memento Black Ink on Pumpkin Pie cardstock and hand-cut them out. For the top one, trim off the two side curves of the pumpkin to make a smaller one. The middle one is regular sized. The bottom is two pumpkins overlapped side by side. If you follow the lines of the pumpkins, you can see how they match up pretty well! Stack them all together and add to the front of the card with Stampin’ Dimensionals.
- The stem/leaf image is stamped with Memento Black on Old Olive, then colored with an Old Olive and Chocolate Chip Marker, and hand-cut. Two more leaves were stamped, colored and cut for the bottom.
- Add a few Silver Sequins from the Metallic Sequins Pack for a little bling!
What do you think? OK…remember…check back tomorrow to see a twisted version of this card! And…don’t forget! We are now taking signups for our Create with Connie and Mary September Mini Session!
***********
Over on Create with Connie and Mary, we are getting ready for our SEPTEMBER 2016 MINI SESSION with projects using stamp sets from the HOLIDAY CATALOG! PLUS…sign up for both the September and October Mini Sessions together and get a free BONUS FALL tutorial! We know you’ll be excited about that!
- Each session includes FIVE step-by-step tutorials for projects…THREE card sets, each with 4 cards and TWO 3D items…perfect for your club or stamp camp!
- All FIVE projects are available once the monthly mini collection opens so you immediately have all projects (and tutorials)
- Mini Sessions open on the 11th of each month
Stamp sets used in this session:
- Christmas Cookie Cutter
- Basket of Wishes
- Halloween Cookie Cutter
- Frosted Medallions
- Jar of Haunts & Jar of Cheer
CREATE WITH CONNIE AND MARY
SEPTEMBER 2016 MINI SESSION ONLY
$8.95 US
![]()
************************************************
FALL BONUS PROJECT: Purchase BOTH September and October 2016 Mini Sessions and get this BONUS FALL PROJECT TUTORIAL using Home Sweet Home Bundle designed by Connie Babbert, perfect for your hostesses or to give as a gift!
Sets we will be using in October Mini Session:
- Christmas Pines Bundle
- Greetings from Santa
- Paisleys & Posies Bundle
- It’s A Celebration
- Candy Cane Christmas
SEPTEMBER AND OCTOBER 2016 MINI SESSIONS
plus BONUS FALL project!
$17.90 US
![]()
****************************************

I LOVE your card, Connie. What a clever idea with the pumpkins!
I love this idea.I love how you modified the pumpkins to get the different sizes.Really a cute idea. Thank you for sharing your creativity
My blog post explains how I did the different sized pumpkins!
great card Connie looks like it could go halloween fall or thanksgiving! thanks for sharing the how to on the pumpkins!
Clever. Clever. Clever!!!