.jpg)
Yes! It's the Tour de Freaks Blog Tour, brought to you by members of the Control Freak Swappers. You've probably just come from Melanie's Blog and you'll go to Mary's after mine…her link is at the bottom of my post. The theme this month is Christmas! I can't wait to see what everyone has done…I know it will be fabulous!
My first project is a step card. Those that are in the Control Freaks swap will remember the Snowman Gift Card I did for the swap. I used the same colors and design for my Simple Seasonal Thanks Snowman. I love the Bermuda Bay, Real Red and White combo this year! If you haven't made one of these, come back later this week for the template! EDIT: You can find the template in THIS POST!
.jpg)
I started by stamping the snowman with Basic Black Classic Ink and coloring him with my AquaPainter and Bermuda Bay Stampin' Write Marker. Then I added the Real Red for the polka dots and hat band, then Pretty in Pink for his cheeks and Pumpkin Pie for his nose. I added 3 Black Mini Brads for his buttons. I cut him out and applied Crystal Effects and Dazzling Diamonds Glitter to the sides of his body and face. At the bottom of each "step", I tore some Whisper White cardstock for a line of snow. The second tier has snowballs, punched with the 1/2 circle punch and sponged with Bashful Blue ink on the edges. They are all stacked up ready for playing. The top tier has a sign post cut from Close to Cocoa cardstock. The sign I stamped Merry Christmas from Teeny Tiny Wishes and punched with the Modern Label punch. I applied the Crystal Effects and Dazzling Diamonds glitter to the snowline, snowballs and the top of the sign. It was FUN making this!
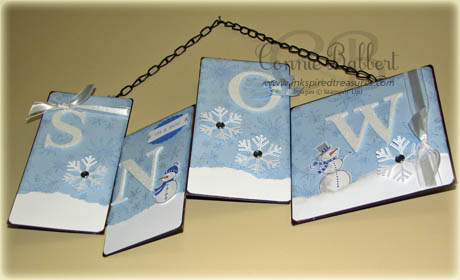
My second project is an altered metal sign. It stands out from the wall, so it has a really neat 3D look to it. Originally it had the word LIKE on it with rustic tones (don't know why anyone would want a sign that said LIKE on it!) I immediately thought of altering it with SNOW! I like that MUCH better! I can't wait to hang this up with my holiday decorations (although I can wait for actual snow to arrive!)

I started by cutting the Bashful Blue cardstock with the measurements for each panel. Then I stamped Serene Snowflakes randomly with Bashful Blue Classic Ink all over the cardstock. I went back with the trio snowflake stamp from that set and used the Frost Shimmer Paint. This REALLY adds a lot of shimmer to the background, but it is SO hard to capture with the camera!
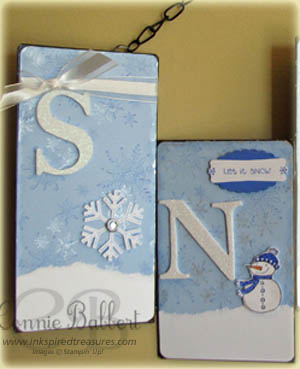
I cut out each of the SNOW letters with my Big Shot and the Serif Essentials Alphabet Bigz Dies from White Sparkle Foam…so pretty! They are adhered to the Bashful Blue cardstock with mini glue dots. I tore some Whisper White cardstock for the snow line. Then I stamped the small and large Hostess Only Level 2 Snow Buddies snowmen in Basic Black on Whisper White and colored them with my Bashful Blue, Ballet Blue and Pumpkin Pie Stampin' Write markers. I added more Frost Shimmer Paint to their bodies.
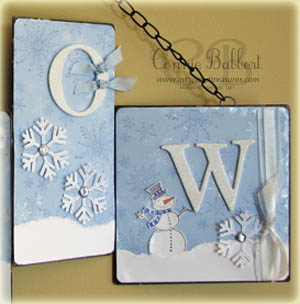
I stamped the Simple Snowflake from the back of the Idea book in Bashful Blue on Whisper White cardstock and punched it with the new Snowflake punch that matches! Quick & Easy! Each snowflake has a Light Blue Rhinestone circle brad in the center of it. I wrapped some White Stripe Organza Ribbon around the top of the left panel and the right side of the right one. The O has some Bashful Blue ribbon wrapped around one side. Finally, I stamped Let It Snow from Punch Pals and punched it with the Modern Label Punch, then layered it on the Scallop Oval cut from Ballet Blue. I think it is a great decoration and wished they had more of them!
Supplies:
Sets: Serene Snowflakes, Snow Buddies, Punch Pals, Simple Snowflake
Inks: Basic Black, Bashful Blue (Bashful Blue, Ballet Blue, Pumpkin Pie Stampin' Write Markers)
Cardstock: Bashful Blue, Whisper White
Accessories: Frost Shimmer Paint, Modern Label Punch, Scallop Oval Punch, White Stripe Organza Ribbon, Bashful Blue Taffeta Ribbon, Serif Essentials Alphabet Bigz Die, Snowflake Punch, Ice Circle Rhinestone Brads,
Head on over to the next stop on the Tour…Mary Brown! I'm sure Mary will have some FABULOUS surprises for you, too!

WOWZA! Love (opposed to Like, LOL) that 3D project. Right up my alley.
Fabulous SNOW sign!
Brrrrrr! LOVE your chilly snowman! I haven’t made a stair-step card in ages! Think I need to try one (thanks for reminding us all how terrific they are!)! And that SNOW banner!! WOW!!! I may just have to, um, be inspired by that!! 😉
Oh my gosh, Connie, you just blew me away! Seriously, those tours just keep getting better and better!!!
I am taking note of this really cool color combo and will have to give it a try myself because I agree – it looks great! Love your use of the stairstep card and the sparkly snowman! And that Snow sign – WOW! It looks great and it is really cool.
Two thumbs up on your projects!
Cindy 😀
FABULOUS Samples, Connie!! Lovely !!!! Patty
Loving all the snowmen-So fun!
Connie, this is soooo cute! But I didn’t understand how it is held togehter in different levels, is the paper 12×12″ and then cut that way?
Hi Connie — what a treat to find your snowman projects today. I am a big snowman collector and really love what you did with both. The metal wall hanging is especially stunning! Great job and great to be on the tour with you! Blessings, Gretchen
Connie, WOW! Oh and did I say WOW?! Fantastic projects! I was NOT going to get that snowman…you are wearing me down!
Connie…You are really weakening my resolve to not buy that big Snowman Stamp…grr!! I’ll be sure to send you the bill! Love the SNOW sign…very clever to see the creative potential in that LIKE sign! Erin
I LOVE snowmen, so your projects are a big hit with me 🙂 I like the little snowmen on the sign, from the Holiday Mini Hostess stamp set…they are so cute!
OMGosh! LOVE them! You rock Connie!
WOW!!! Love the card and the banner. These are great and I will be TRYING to case them. You are a great artist!
You are rocking that snowman! Another wonderful card. Now as for that SNOW sign…just two words for that…LOVE IT!!! (okay..two more…WANT ONE!!!)
Your step card is amazing…I love the details! I love all your projects!!!
Okay, your altered metal sign has to be the CUTEST thing I’ve seen yet on this tour!!! Absolutely clever, darling, and fun!! Thank you for sharing!!!!
WOW! That wall hanging is GORGEOUS!!! Love the stair card too! TFS!
Wow, Connie, love the altered sign! Beautiful.
I LOVE the sign. I really have become a Big FAN of altered items. I still love cards but anything that needs an update-I am on it!! Super Job!
Your SNOW sign is too cute! What an awesome job altering something that I wouldn’t have even taken a second look at. Thanks for giving me such great ideas!
Love the snowman card! I especially like the brads for buttons and the crystal effects snow.
I LOVE this card! I haven’t made a step card before so I am eagerly waiting for the template. Thanks for sharing such a cool idea.
Gorgeous Connie! I can’t tell you how much I love both of these projects. Fabulous work!