
Happy Saturday! It’s time for the Create with Connie and Mary Saturday Blog Hop and our theme this week is Technique Cards! I remember when I did technique cards ALL the time! I even ran a Technique Class every month for over six years! But, I stopped doing a lot of techniques on my cards. May have to jump back in!
POSITIVE THOUGHTS
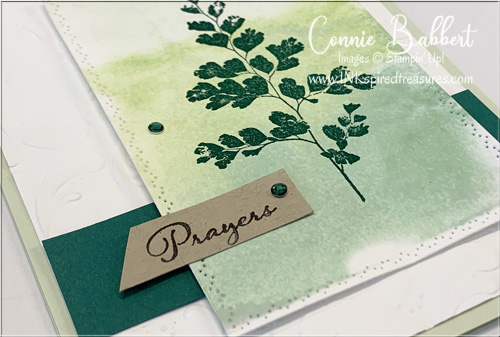
This technique has always been one of my favorites. I don’t know if it has an official name, but I call it “Acrylic Block Watercolors” and it is SO quick and easy to change up with whatever colors you want to use! I also pulled out my new Positive Thoughts and Nature’s Thoughts Dies for this card!

Stampin’ Details:
- The base is 4-1/4 x 11 Soft Sea Foam cardstock, scored at 5-1/2 and folded.
- The 4 x 5-1/4 layer of Whisper White cardstock was embossed with the Parisian Flourish Embossing Folder.
- A 1 x 4 piece of Shaded Spruce was added across the front.
- Another 3-1/2 x 4-3/4 piece of Whisper White cardstock was used for the technique…I wanted an Ombre effect. The E sized Acrylic Block was colored along the bottom third with Garden Green Marker, the middle third with Granny Apple Green Marker and the top third with Soft Sea Foam Marker, scribbling directly on the block with the marker. It was spritzed with water, then stamped onto the Whisper White cardstock and let dry.
- The Whisper White was then cut with the Nature’s Thoughts embossed rectangle…can you see the dotted scallop it cuts? SO pretty!
- After dry, it was stamped with the large fern from Positive Thoughts stamp set using Shaded Spruce Ink, then added to the front with Stampin’ Dimensionals.
- Another technique used was “omit stamping”. I inked up just the word “Prayers” with the Basic Black Marker and stamped on a 1/2 x 1-1/2 piece of Crumb Cake cardstock, then cut one end at an angle. It was added to the front.
- A trio of Holiday Rhinestones (still available to order!) in the dark green color were added in the background!
I really LOVE this card!!! You need to try this technique, ok? Next up on our blog hop is our Create with Connie and Mary website, then on to creative Mary Brown, or head backwards to see Melissa’s fabulous technique card and see what everyone did with this challenge!


Ghosts and bats and cats, oh my! The OH MY FRIGHT COLLECTION will kick off your Halloween season with sweet and spooky images! Create layers of scary fun with a twisted tree and add cats, bats, a spiderweb, a witch's hat and other accessories to decorate your cards, tags, scrapbook pages and other crafty projects! Finish with a playful Halloween greeting! We've combined the OH MY FRIGHT BUNDLE and the magical patterns in the FRIGHTFULLY FUN 12x12 DESIGNER PAPER! You'll get step-by-step tutorials for FOUR cards and TWO decorated White Gable Box ideas in our OH MY FRIGHT COLLECTION! See more details HERE!

The SIMPLY LEAVES PUNCH BUNDLE can be used for ANY season! Follow our card journey through Spring, Summer, Fall and Winter using this versatile stamp set and punch! The patterned leaves will add natural detail and texture on your cards and projects, then add one of the simple greetings to finish. We've combined the SIMPLY LEAVES PUNCH BUNDLE and the garden neutral patterns in the VALLEY OF BLOOM 12x12 DESIGNER PAPER! You'll get step-by-step tutorials for EIGHT cards...two card ideas from each season...in our SIMPLY LEAVES CARD COLLECTION! See more details HERE!

Create wonderful dimensional poinsettias in a variety of sizes with the PRETTY POINSETTIA BUNDLE! The dies cut and emboss at the same time for lots of detail and texture. The coordinating stamp images add fun seasonal greetings, sprigs and other festive touches to your cards and projects. We've combined the PRETTY POINSETTIA BUNDLE and the A STITCHED SEASON 12x12 DESIGNER PAPER for a traditional holiday look you'll love! You'll get step-by-step tutorials for SIX projects...FOUR cards and TWO favors in our PRETTY POINSETTIA COLLECTION! See more details HERE!
