It's time! The monthly Tour de Freaks is going on now brought to you by the fabulous Control Freak Swappers! I know I'm always blown away by the swaps that I get from this group! You've just come from Cindy Major's Blog...aren't her projects darling? Make sure to take the entire tour…we have 11 stops this time! The theme this month is Fall or Halloween! I can't wait to see everyone's projects!
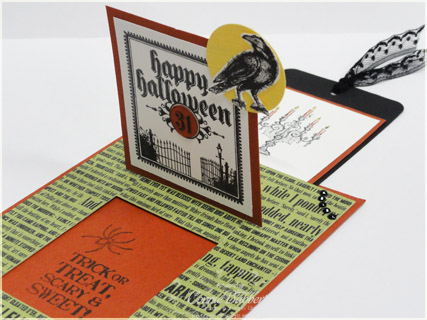
My first project is a Flip Card. I haven't done one of these in years! I've always loved interactive cards…and this one is especially fun, but pretty easy to make! My Stamp Club will be making one of these at our meeting next week, so they are getting a little sneak peek…I haven't decided it I'll use this Halloween one or make up a different one. Here is the front.

The base is Cajun Craze and I layered on the Nite Owl DSP from the Holiday Mini. To give it extra strength, I adhered it to Pear Pizzazz cardstock. You can't see it, but it does help support the sliding mechanism. I stamped the Happy Halloween sign from Stampin' Up!'s Dark and Dreary with Black Craft ink once on Whisper White and embossed with Clear Embossing Powder, then again on Cajun Craze and punched the 31 out with the 1/2 circle punch. The sign is layered on Cajun Craze cardstock. I also added a few of the Black Flourish Jewels on the corners for a little bling! I adhered a 1 1/4 punched Daffodil Delight textured cardstock "moon" in the upper edge of the sign and stamped the Raven with Basic Black on Whisper White, then cut him out and placed him on the moon. And the magic happens when you pull the Black Raven Lace Trim ribbon tab!

The center sign piece flips open and reveals a greeting "Trick or Treat, Scary & Sweet" from Stampin' Up!'s Grateful Greetings that I stamped in Basic Black on Cajun Craze. Then the top where I stamped the Candlelabra from Dark & Dreary stamp set in Basic Black and watercolored with Cajun Craze, Daffodil Delight and Basic Black Stampin Write Markers and my AquaPainter. isn't that FUN??? I was thrilled with how it turned out! Leave me a comment if you want me to post directions after the Blog Tour is over!
OK, for my next project, I found some wire garden decorations at the nursery. I just knew I could do something with them! So, when I was trying to think of a 3D project (and cleaning out my back room), I found them again. I made the Pumpkins by cutting three Ovals for each from the Scallop Oval Frame die from Pumpkin Pie cardstock. I sponged the edges with Tangerine Tango Classic Ink and adhered them together in a trio. I added the Chocolate Chip stem that I ran thru the Big Shot with the Square Lattice Impressions Folder. I also cut a 1/4 inch strip of Old Olive cardstock, wrapped it around my stylus to make it curly. I adhered these to the wire with glue dots.

Then I cut some fall leaves with the Leaves #2 die in Cajun Craze, More Mustard and Cherry Cobbler cardstock. Each of them is texturized with the Perfect Polka Dots, Square Lattice or Finial Press Impressions Folders. I added Neutral Designer Buttons that I tied with 1/8" Early Espresso Taffeta Ribbon in a knot thru the button holes. I also punched four 1 3/8 circles from Early Espresso cardstock and added the Fall letters cut from Timeless Type Alphabet Dies and Old Olive cardstock. I also glittered them with Versamark and Iridescent Ice Embossing Powder! Finally, I added the Black 1 1/4 Striped Ribbon the wire between each panel.
BUT…wait…there is a surprise!!! Flip it over and you can decorate for Halloween, too!

So, I used 3 more Ovals for EACH Jack-o-lantern on the reverse side. I used the 1 1/4 Square Punch for the eyes, then cut a 1" square in half for the nose. The mouth I used the Circle Scissors Plus Tool to cut the crescent shapes, and cut out the teeth areas. I added the stems the same as the other side. At the top, I added Basic Black 1 1/4 Circle Punches and the word Boo! behind the Fall letters on the reverse side. So…I got TWO decorations for the price of one…pretty cool, huh???
And….here is the display as it is on top of my Cabinet in the kitchen area! I'll be able to get a good three months of use out of it before I put up Christmas decorations after Thanksgiving!

Hope you enjoyed my Fall/Halloween projects! Now you are in for a "TREAT" with Mary Brown's fun projects, so continue on the tour by clicking on the button below! Enjoy!
.jpg)
.jpg)
