
Happy Saturday! It’s time for another Saturday Blog Hop! This week our theme is a Christmas Treat or Favor! Those that follow me, know that small favors and treats are my FAVORITE things to do! I made a bunch of these single serve “Mug Cake” holders for my craft show today. Hope I sell out! I think they turned out super CUTE!

Stampin’ Details:
- The base is 4-1/4 x 11 Coastal Cabana cardstock, scored at 5-1/4 and 5-1/2 and folded. Trim the top of one edge with the large Layering Ovals Die.
- Using the cut off partial oval, and a smaller oval die, cut the handle. Adhere to the back (inside) of the front cup.
- Corner round the top corners on the back portion.
- Stamp the front with Snowman Season snowflakes in Coastal Cabana Ink randomly.
- A 1-3/4 x 4-1/4 piece of Whisper White is stamped with the Cup of Christmas greeting in Real Red Ink and adhered to the front.
- The cup base was cut from Real Red cardstock and the striped decoration with Coastal Cabana cardstock with the Cup of Cheer Dies and adhered together, then added to the front with Stampin’ Dimensionals.
- Since the Mug Mix was Caramel Brownie Mix, I hand-cut the “cake” shape from Early Espresso cardstock and added it behind the top of the cup. Add a Clear Epoxy Dot to the “cake”. (I used a retired Heart, but the circles are still available and would be just as cute.)
- Tie the Real Red 3/8″ Cotton Ribbon around the entire cup, tie a knot, then add the wood spoon (Amazon had these teal chevron ones). I stamped the spoon with “Enjoy” from Cup of Christmas in Real Red Ink on the handle.
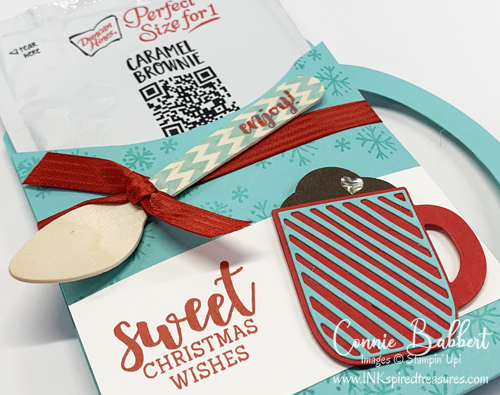
Isn’t that a FUN little gift? I’ll tuck in a gift card for my mailman and UPS driver! SO sweet! OK, go check out the rest of the Design Team to see they did with the “Christmas Favor or Treat” Blog Hop Challenge this week! Next up on our blog hop is our Create with Connie and Mary website, then on to creative Mary Brown, or head backwards to see Melissa’s fabulous card!


But first check out our current Collection…

How fun to create a traditional Christmas Village using Stampin' Up!'s WELCOME NOEL BUNDLE! Stamp the houses, trees and deer elements to build your holiday scene or cut them quickly with the detailed shapes and the WELCOME NOEL DIES. We used greetings from the Winter Adventures stamp set or use your own sentiments to finish it off. We've paired the WELCOME NOEL BUNDLE with the WINTER DREAMS 12x12 DESIGNER PAPER featuring white on deep blue designs for your winter-themed crafts. Our WELCOME NOEL COLLECTION gives you step-by-step tutorials for FOUR cards and TWO enhanced special fold card ideas for a total of SIX tutorials to use in your classes or personal use. See more details HERE!

Create the feel of a nature walk through the winter woods with Stampin' Up! FROSTED PINECONES BUNDLE! Stamp the pinecone and then add textured details using the FROSTED PINECONES DECORATIVE MASKS or cut the detailed shapes with the FROSTED PINECONES DIES. Add one of the heartfelt winter sentiments to finish it off. We've paired the FROSTED PINECONES BUNDLE with the WHISPERING WOODS 12x12 DESIGNER PAPER. Our FROSTED PINECONES COLLECTION gives you step-by-step tutorials for FOUR cards and TWO small decor ideas for a total of SIX tutorials, all full of seasonal charm. See more details HERE!

Boo! October brings Halloween and the playful images in Stampin' Up!'s WEB OF FUN BUNDLE will create a little spooky fun on your cards, paper crafts, and scrapbook pages! The large greetings and detailed spiders and webs will fill your project space with eerie delights! We've paired the WEB OF FUN BUNDLE with the FRIGHTENING FUN 12x12 DESIGNER PAPER containing even more Halloween patterns and designs! Our WEB OF FUN COLLECTION gives you step-by-step tutorials for FOUR cards and TWO favor ideas for a total of SIX tutorials, all full of festive Halloween charm. See more details HERE!


Leave a Reply