• Create with Connie and Mary
  • Clearance Rack Deals!
  • Tutorials for Sale
  • Skip to primary navigation
  • Skip to main content
  • Skip to primary sidebar

Inkspired Treasures

Connie Babbert, Stampin Up! Demonstrator

  • Home
  • Events
  • Shop My Online Store
  • Latest Catalogs
  • Join My Team
    • Sign Up!
  • Retired SU Products for Sale
  • Show Search
Hide Search

CCMC332 Star Angel Gift Card Holder

December 4, 2014 By Connie | 10 Comments

We have a really fun challenge this week over on Create with Connie and Mary!  We switched it up a little due to the upcoming Christmas holidays and thought we’d have a “Make a Gift Card Holder” theme this week!  It can be any style holder…check out what the Challenge Team did…they are all VERY different!


CCMC332

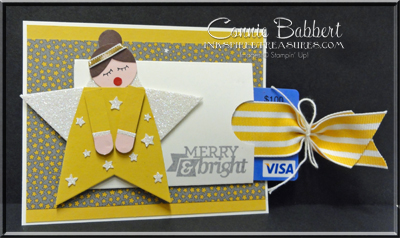
I personally give some gift cards at Christmas, but I also like to dress them up a little!  For this one, I used the Gift Card Envelope Thinlet for the holder, but added it to a card front!  I designed a simple version of this sweet little angel for my tag class this week…but I’ve embellished her even more for this project by giving her sparkling Glimmer Wings and Confetti Stars on her dress, plus her hair in a bun!  lol!

CCMC332 Star Angel Gift Card Holder

A few details:

  • The base is 4 1/4 x 5 1/2 Whisper White.  On top is a 4 x 5 1/4 layer of Hello Honey.
  • The Santa & Co. Designer Paper is cut 3 1/2 x 5 1/4.
  • Whisper White was used with the Gift Card Envelope Thinlet and I cut off the smaller side, then sealed the edges of the envelope on 3 sides.  I punched a partial 1″ circle on the open end so the gift card would be easy to pull out.
  • I wrapped the Daffodil Delight Striped Ribbon around the gift card tightly, then tied it closed with White Bakers Twine.
  • The Angel base is Dazzling Diamonds Glimmer Paper cut with the Star Framelit.  I also cut the same size star from Hello Honey and cut away the top and two side points to make her dress.  The arm sleeves are the Word Window Punch in Hello Honey and her hands in Blushing Bride.  I cut a sliver of the Dazzling Diamonds Glimmer Paper to make the trim on her sleeves.
  • Her head is a 1″ Circle of Blushing Bride with a 1/8″ Circle of Real Red for her mouth and I drew on the eyes with lashes.  The hair is the 1″ circle cut from Chocolate Chip and a 1/2″ punched circle for the “bun”.  The halo is a piece of 1/8″ Gold Ribbon.
  • I used the Confetti Punch with Dazzling Diamonds Glimmer Paper to punch our the stars and adhered them to the front of her dress randomly.
  • Then I popped up my angel on the front of the gift card envelope with Stampin’ Dimensionals and stamped the greeting from Christmas Bliss with Basic Gray ink on the envelope.


When you pull on the ribbon, the gift card slides out!


CCMC332 Angel Star inside

Didn’t she turn out sweet?  I was so happy with the tag I made for my Tag Class, that I just knew I had to use her again!  Make sure to check out what the rest of the Challenge Team did this week over on Create with Connie and Mary and get some great ideas for gift card holders!

Filed Under: Cards, punch art Tagged With: #stampinup, Gift card holder, punch art, Stampin' Up!, Star Angel

I love stamping cards, altering 3D items and making little favors. I've been stamping for over 19 years and had my 18th year Stampin' Up! anniversary in early May. I love being part of something that sparks my creativity and hear people comment, "you MADE this?" I also enjoy sharing that passion with others in my classes! If you live anywhere in the Delaware, Dublin, Powell, Lewis Center, Hilliard or surrounding Columbus, Ohio areas, join us! I love to meet new stamping friends. Email me for a current class schedule... I'm adding new classes all the time!

Reader Interactions

Comments

  1. Jenny Engelke says

    December 4, 2014 at 8:54 am

    Oh, Connie! This pretty much the cutest catd I’ve seen this season! Such a cute design with the star turned into an angel! Super adorable! !!!

  2. Mitzi Luttrull says

    December 4, 2014 at 9:22 am

    This is so pretty Connie! Very different from the other gift card holders I’ve seen. Thank you!

  3. Nicole Tugrul says

    December 4, 2014 at 11:21 am

    What a sweet angel!! You are so very clever!! I love your idea and will have to make some too!!

  4. Carol Carriveau says

    December 4, 2014 at 5:02 pm

    Just adorable and thinking she will make a fabulous tag for my younger great niece! TFS!

  5. Jan Hoyt says

    December 4, 2014 at 10:41 pm

    CUTE gift card holder, Connie and I love the angel! Thanks for the step by step directions that is awesome! But you can’t fool me…I recognize that GR VISA gift card! ha, ha! I save my empties as well and use them to demo GC’s….but only after I have finished spending them!

  6. Lisa Young says

    December 5, 2014 at 4:31 pm

    I commented to Mary how much I am loving this challenge because I have gotten great ideas for gift cards! Your angel is absolutely adorable and the way you incorporated the gift card holder is so clever! Thanks for the inspiration.

  7. Debbie Henderson says

    December 8, 2014 at 8:17 pm

    What a clever project Connie! Love it!

  8. Lisa Martz says

    December 8, 2014 at 8:44 pm

    We had the same idea to incorporate the gift card on the front of a greeting card. Love the punch art angel.

  9. melissa davies says

    December 9, 2014 at 6:26 am

    LOVE that sweet little star angel! You are so creative!

  10. Deb says

    December 9, 2014 at 9:50 pm

    Oh my goodness! What a perfectly sweet little angel! I love what you did to create this! Just awesome!!

Leave a Reply Cancel reply

Your email address will not be published. Required fields are marked *

Primary Sidebar

Use HOST CODE:  DFQD4KKC 


Love is in Air!  Not only on February 14th, but really just about any time of the year.  One thing we love about the Forever & Always Stamp Set and Always Dies, is that it isn’t just for Valentine’s Day!  If you look closely, it is perfectly suited for any day…birthdays, anniversaries, or weddings!  Our next collection featuring the Love You Always Suite has a little of everything!  We’ve made three cards (one a fun fold), and a decorated gift box that has a couple treats and a surprise inside for someone special!  See more details HERE!

Could the Snail Mail Suite of products be ANY cuter?  Look at those little faces and those Resin Hearts…oh my!  We are using the Snailed It Stamp Set and Snail Dies for our next Collection of tutorials!  For this Snailed It Collection, we’ve made three cards (one a fun fold), and an absolutely FUN and unique favor box that is perfect for your stamp camps and classes!   You’ll want to make several to give away!  See more details here!


For our Friends are Like Seashells Collection, we’ve made FOUR cards (one a fun fold), a small favor and a 3D project that are perfect for your stamp camps and classes!   This bundle has a coordinating 3D Embossing Folder that can be used with the large die for a stamp, emboss and cut combo that has so much texture, they almost look real!  See more details HERE!


Connie Babbert
Stampin’ Up! Demonstrator
Lewis Center, OH
614-371-8484


Subscribe to Blog via Email

Enter your email address to subscribe to this blog and receive notifications of new posts by email.

Archives

Categories

Disclaimer

As an independent Stampin’ Up! demonstrator, all of the content on this blog is my sole responsibility and the use of and content of the classes, services, or products offered is not endorsed by Stampin’ Up!

The contents of my blog are my own and ©Connie Babbert and as such may not be copied, sold, changed or used as your own for ANY magazines, contests, Stampin’ Up! events, swaps, profits or otherwise without my permission and is here solely for the purpose of inspiration, viewing pleasure and enjoyment. Thank you for understanding.

Content © Connie Babbert, All Rights Reserved. Genesis framework customized by WebsByAmy.com