
Happy Monday! It’s time for our Create with Connie and Mary Inspiration Monday challenge! We have a GORGEOUS bright floral photo to inspire you!

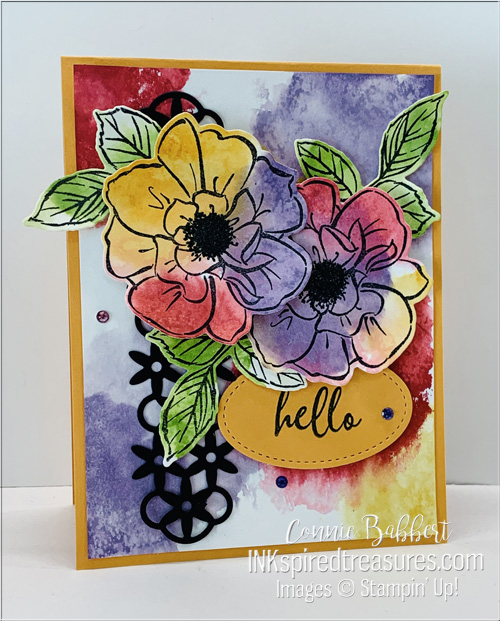
I used To A Wild Rose and a fun background technique for my card today! Isn’t it vibrant?
Stampin’ Details:
-
- The base is 4-1/4 x 11 Mango Melody cardstock, scored at 5-1/2 and folded.
- On the 4 x 5-1/4 layer of Shimmery White Paper, I did the watercolor background technique below with the colors of Highland Heather, Melon Mambo and Mango Melody Inks.
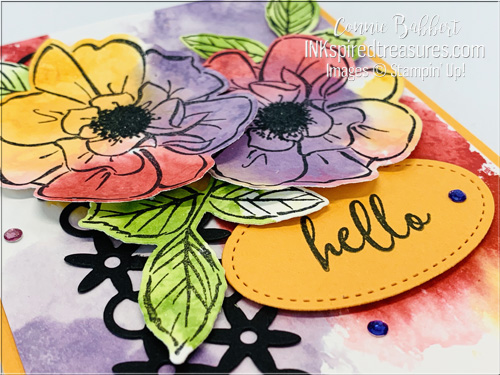
- The lattice was cut from Basic Black with the Wild Rose die and added on top.
- The flowers were stamped on another sheet of watercolor background with Memento Black outline image and cut with the Wild Rose die.
- The centers of the two flowers were darkened with stamping the center in Memento Black Ink several times and the flowers were added to the front with Stampin’ Dimensionals.
- The leaves were stamped on the Granny Apple Green watercolor background paper and cut with the leaf die in Wild Rose. They were added under the flowers with Stampin’ Dimensionals.
- Hello from To A Wild Rose was stamped with Memento Black Ink on Mango Melody and cut with the Stitched Shapes Oval, then added to the front with Stampin’ Dimensionals.
- A few Noble Peacock Rhinestones were added to the background.
WATERCOLOR BACKGROUND:
Take a 4-1/4 x 5-1/2 card size piece of Shimmer White and spritz with water. Using a solid image, stamp randomly with first color Highland Heather. Clean stamp, ink with Melon Mambo. Clean, stamp with Mango Melody. I made two of these…one for stamping the flowers and one for the background.
On second 4-1/4 x 5-1/2 Shimmer White, use Granny Apple Green and solid leaf image. Spritz background, then apply the leaves randomly several times. As you work and it dries, the image will become more distinct. Leave some white space.
Stamp the outline images with Memento Black randomly over top the watercolor backgrounds when they dry. Make sure to get a variety of the different colors on one image. Cut with dies.

What a FUN technique and EASY! I think it really gave me the look of the abstract floral inspiration piece! OK, make sure to check out what Mary did with this challenge over on Create with Connie and Mary!

Ghosts and bats and cats, oh my! The OH MY FRIGHT COLLECTION will kick off your Halloween season with sweet and spooky images! Create layers of scary fun with a twisted tree and add cats, bats, a spiderweb, a witch's hat and other accessories to decorate your cards, tags, scrapbook pages and other crafty projects! Finish with a playful Halloween greeting! We've combined the OH MY FRIGHT BUNDLE and the magical patterns in the FRIGHTFULLY FUN 12x12 DESIGNER PAPER! You'll get step-by-step tutorials for FOUR cards and TWO decorated White Gable Box ideas in our OH MY FRIGHT COLLECTION! See more details HERE!

The SIMPLY LEAVES PUNCH BUNDLE can be used for ANY season! Follow our card journey through Spring, Summer, Fall and Winter using this versatile stamp set and punch! The patterned leaves will add natural detail and texture on your cards and projects, then add one of the simple greetings to finish. We've combined the SIMPLY LEAVES PUNCH BUNDLE and the garden neutral patterns in the VALLEY OF BLOOM 12x12 DESIGNER PAPER! You'll get step-by-step tutorials for EIGHT cards...two card ideas from each season...in our SIMPLY LEAVES CARD COLLECTION! See more details HERE!

Create wonderful dimensional poinsettias in a variety of sizes with the PRETTY POINSETTIA BUNDLE! The dies cut and emboss at the same time for lots of detail and texture. The coordinating stamp images add fun seasonal greetings, sprigs and other festive touches to your cards and projects. We've combined the PRETTY POINSETTIA BUNDLE and the A STITCHED SEASON 12x12 DESIGNER PAPER for a traditional holiday look you'll love! You'll get step-by-step tutorials for SIX projects...FOUR cards and TWO favors in our PRETTY POINSETTIA COLLECTION! See more details HERE!

Leave a Reply