
Today is Stamping 411's Sketch Challenge #135! This one, although it looks very simple, gave me just a little trouble. I think because of the stamp image I chose. The position of the image had the white space in the lower right corner, instead of the upper left where I needed to put something because of the sketch. I compromised by putting a little something in both locations!
I love Stampin' Up!'s whimsy sometimes. LIke this single stamp, Like-O-Meter in the back of the Occasions Mini! I especially like the "a lot but not like a stalker" words! Too funny! My friend, Cassy, gave out a CUTE swap card at Leadership using this set!
I started with a base card of Real Red cardstock. I added a piece of Sending Love Designer Paper and layered it on Basic Black cardstock. On the left side of the Basic Black, I used the Pinking Hearts punch along the edge.
 I stamped the Like-O-Meter image in Basic Black on Whisper White, then colored in the themometer with the Real Red Stampin' Write marker up to …a lot but not like a stalker. I added a very light coat of Crystal Effects over top of the red. You need to be careful because the marker is water based and will run if you add too much. When dry, I punched the Small Heart in the lower right corner, then layered it on Real Red, then Basic Black cardstocks. Finally I added a Black Gingham Bow to the upper left corner.
Too fun! I love it! I think my hubby will get this for Valentine's Day…not too girly looking so he should like it!
Have a wonderful weekend!
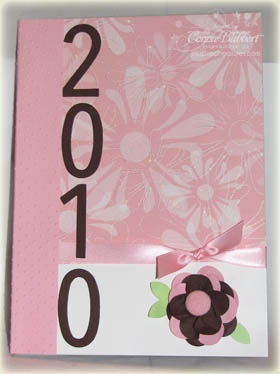 I spent the day yesterday at a good friend's house…Mindy! I took some much needed time to work on some personal stamping projects. One project was my 2010 Calendar! Each year I buy the cheap vinyl covered ones and take off the vinyl. Underneath is a light weight cardboard that I cover with our pretty designer paper! I knew the minute I saw Stampin' Up's new Sending Love Designer Paper, that I would use it for my calendar. However, I just got around to doing it!
.jpg)
 First up is a 5 1/2 x 5 1/2 card using the beautiful Sending Love Designer Paper…did you know that EACH sheet glitters? It is so sparkly in person! I started with a base of Pretty in Pink cardstock and added the small floral pattern from Sending Love. I added a band of Pretty in Pink, punched on both sides with the Pinking Hearts Border Punch. Layered inside is a strip of Real Red cardstock. I stamped Happy Valentine's Day from Teeny Tiny Wishes in Chocolate Chip under the 6/8 Pretty in Pink Satin Ribbon. I used the Scallop Heart of Hearts Embosslit with Very Vanilla and Pretty in Pink cardstock and placed them on the right, then added a Real Red heart punched from Heart to Heart Punch and a Real Red Epoxy Brad. But wait…what's INSIDE is all the FUN!
 INSIDE I used the Simple Birthday Thanks cupcake and stamped the bottom in Basic Brown on the small floral pattern from Sending Love and cut it out. I scored it every 1/4 inch and pleated it to form the cupcake liner. I stamped the top on Pretty in Pink and cut it out. I adhered the base to the top. Then I punched LOTS of the medium sized hearts from Heart to Heart punch with the glittery pink floral pattern in Sending Love and placed them randomly on the Pretty in Pink base for the frosting. I punched the small heart from the same punch in Real Red and placed them as "sprinkles" on the frosting. I punched the long heart from the Red Pattern Designer paper for the "cherry" and added a Chocolate Chip cardstock stem.
  I cut the pop-up piece in the Pretty in Pink along the bottom and adhered the LOVE cupcake to the front of it. I added the red heart flower pattern Sending Love Designer Paper in the background of the top and a strip along the bottom. I added more stamped hearts from I {Heart} Hearts, the Scallop Heart of Hearts and punched Heart to Heart pieces. Finally, I stamped Love You Much from Well Scripted stamp set in the Occasions Mini in Real Red Classic Ink. I LOVE how this turned out!
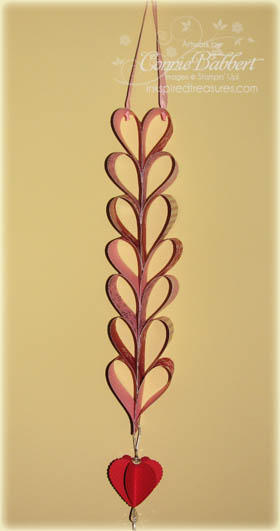 OK…my next project was VERY fun to make! I'll put up a tutorial on how to make it in the next few days! Here I made hearts from the Sending Love Designer Paper patterns and adhered them together. At the bottom, I used the Crop A Dile and set a Silver Eyelet. I added a little ornament made with six Scallop Hearts, scored in half, and adhered together. I did use the Silver Cord (from the Holiday Edition) to form a loop and added some crystal beads from the Pretties Kit at the top and bottom. At the very top of the wall hanging, I added two more silver eyelets, then added a loop of Pretty in Pink Taffeta Ribbon so it is easy to hang. Again, I was SO happy with how this turned out! Even my husband said, "That's really cute!"

.jpg)

.jpg)
.jpg)
.jpg)
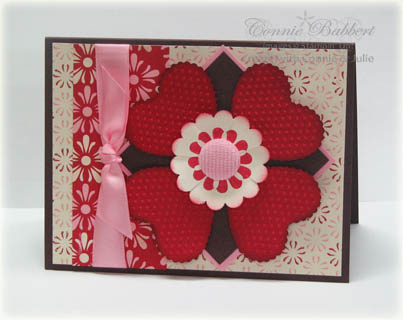 This week's Color Challenge was to create a card using the colors of Real Red, Pretty in Pink, and Chocolate Chip. Of course, those are the same colors in the Stampin' Up! Sending Love Designer Paper, so I had to use it!
 Time for this week's Stamping 411 sketch challenge! On my card, I used two of the new Stampin' Up! Sale-A-Bration sets, Happy Moments and Vintage Labels. I really like BOTH of these…well, truly, I like ALL the Sale-A-Bration selections this year!
.jpg)
.jpg) It's time again for a Ribbon Share! Stampin' Up!'s 5/8" Stain Ribbon is GORGEOUS and ties beautifully! Truly bright and vivid colors!
It's time again for a Ribbon Share! Stampin' Up!'s 5/8" Stain Ribbon is GORGEOUS and ties beautifully! Truly bright and vivid colors! 