Wow! Where does the week go? It's Saturday again and time for another Create with Connie and Julie Challenge! Every Saturday on the Create with Connie & Julie site we issue a challenge. Our subscribers are encouraged to enter the challenge to win fabulous prizes! Last week's challenge winners were Becky Graham, Lori Watson and Robin Gregor as honorable mention! Congratulations, ladies!
 For this week's challenge the theme is Easter Cards! Our focus was on Stampin' Up!'s stamp set Eggcoutrements, Chocolate Bunny stamp, Spring Floral Wheel and the Eggcellent Egg Kit. I chose to feature the Chocolate Bunny for my Easter Card! I LOVE him!
I started with a base card of Certainly Celery, then used two different patterns from Tea Party Designer Paper. I used the Scallop Trim Border Bunch along the top and the bottom. I stamped the Easter Bunny in Vanilla Craft Ink, Close to Cocoa Craft Ink and Chocolate Chip Craft Ink, then embossed with Clear Embossing Powder and cut them out. Of course, they represent the three types of chocolate…white, milk and dark! Yummy! They look real! I wrapped some Pretty in Pink Taffeta Ribbon across the top and added the Scallop Oval punched tag stamped with Happy Easter from Well Scripted. I highlighted the word happy with my Certainly Celery Stampin' Write marker!
Supplies:
Sets: Chocolate Bunny, Well Scripted
Inks: Vanilla Craft, Close to Cocoa Craft, Chocolate Chip Craft, Certainly Celery Stampin' Write Marker
Cardstock: Certainly Celery, So Saffron, Whisper White
Accessories: Tea Party Designer Paper, Scallop Trim Border Punch, Pretty in Pink Taffeta Ribbon, Scallop Oval Punch
Make sure to check out what the rest of the design team did this week and be inspired for your own Easter cards!
 It really isn't too late to sign up for the Create with Connie and Julie Occasions Edition subscription! There is a new project posted every day and there will be a minimum of two fabulous tutorials each and every week. We like to have lots of fun so we have challenges and prizes for our subscribers. Our sites stay up long after the session is done so you will always have access to the site and the tutorials. For more information and to see our Preview Week projects please visit at Create with Connie and Julie.
.jpg)

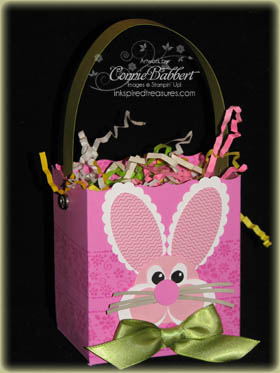 My second project uses the Big Shot again with the Fancy Favor Box. I cut it from Pixie Pink cardstock and ran the Spring Floral Wheel in Pixie Pink Ink Cartridge across the bottom of it twice. I used the Wheel Guide to help me keep it straight!
.jpg)
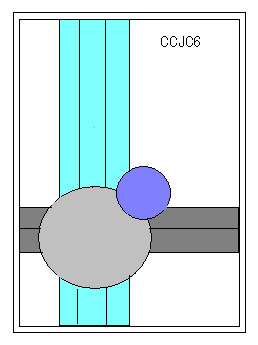
 It is time for another Stamping 411 Sketch Challenge! The weeks are FLYING by aren't they? You can tell it is a BUSY night/day for me with posts. Stamping 411, Tour de Freaks and Create with Connie and Julie Challenge will all post at the same time!


.jpg)
.jpg)
 Every Saturday on the
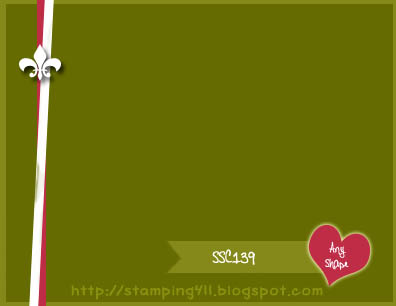
 It's Saturday and time for another Stamping 411 sketch challenge! I always love to see what the other Operators create. I'm amazed at how different our cards normally are, even using the same sketch!
