.jpg)
If you have arrived here on the 19th, not all links may be live yet. We're getting ready to go live on March 20th! It's time for the March Tour de Freaks by your favorite Control Freak Swappers! Our theme this month is SPRING! You've probably just arrived from Wendy Janson's Blog and her amazing ideas. You'll be able to go to the next stop when you click on the badge at the bottom. I always get some amazing ideas from this tour, I hope you do, too!
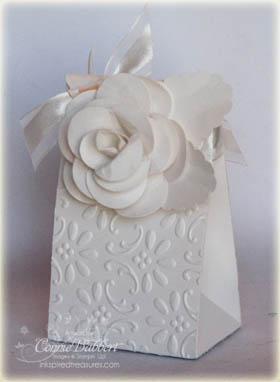
I was late getting ready for this tour…I definitely have "wedding" on the brain! I've been working on the templates for printing out my son's wedding invitations, plus buying the supplies I'll need to make 200 of them. The pocket invitation design idea has been done for a while, just needed to get started. But, thinking about it inspired my first project. And since the month of June is mostly in the Spring, I think it fits the theme!
I've had the Bag with Scallops XL die for a long while, but haven't used it for some reason! I pulled it out for this project. I thought one of the roses made from the XL Fancy Flower punch would be perfect on the front scallop! The bag and rose are both made from the White Shimmer paper…so pretty for a wedding! I added the half Scallop Oval leaves along the side of the rose, then added the White Satin Stripe Ribbon knotted along the other side of the rose. The front of the bag I textured with the Finial Press Impressions Folder that I ran thru the Big Shot. The bag was really easy to put together! I wrapped some more of the White Satin Ribbon around it to hold it closed (under the rose). Very elegant and I think they would be pretty at the place settings at the reception! I'll be making more of these Bag with Scallops…so fun and easy to put together!
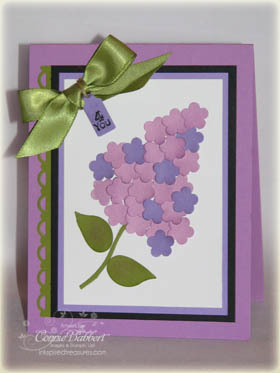 My next card is a Mother's Day card for my mom. We both LOVE lilacs in the spring! I know it is finally here when my lilacs are in bloom. I've planted lilac bushes in every house we've lived in and will cut the blooms off to bring them inside so I can enjoy their fragrance. I've been wanting to do a punch art card using the Trio Flower punch to make some lilacs. I used Orchid Opulence and Lavender Lace cardstock and punched a BUNCH of them!
I started by placing the "stem" from the Two Bird Punch at the bottom of the Whisper White cardstock. Then I used the bird wings from that punch for my leaves. I just started adding a variety of the Lavender Lace and Orchid Opulence flowers in a cone shaped pattern. Each lilac is so unique anyway, it really didn't matter how I placed them! I added a little Orchid Opulence Classic Ink to the edges after I was done, just for some added shadows.
I layered the Whisper White on Lavender Lace and then Basic Black cardstock to make it pop. I tied the Old Olive Satin Ribbon into a bow and placed it at the top corner. Then I added the Old Olive Scallop Trim Border across the left side. Finally, I used the stamps from Tiny Tags and the Jewery Tag punch to make the 4 You tag and wrapped it with Linen Thread around the center of the ribbon knot.
Next stop is Mary Brown! I'm sure you will love her work! Have a great day!
.jpg)
 It's time for the Stamping 411 Sketch Challenge! This week's sketch was really fun and quick to do! I really like the end result!
 I stamped the dotted square pattern in Stampin' Up!'s Extreme Elements stamp set in the background of the Whisper White with Pumpkin Pie Classic Ink (stamping off, too). Then I inked up the Extreme Guitar player stamp with Chocolate Chip Craft Ink and stamped over top. I like to use Craft Ink with my bold stamps in order to get better coverage with the ink. I layered the Whisper White on Chocolate Chip cardstock and placed it. As a final touch, I punched a Large Star from Pumpkin Pie and a Small Star was punched from a scrap of the Designer Paper. I placed a So Saffron Mini Brad in the center and placed it with Stampin' Dimensionals!
 Today certainly feels and looks like spring around here! We have been having beautiful sunny days (unusual for Ohio) and temps in the high 50s, low 60s. I can see the golfers playing from my house, so the course must be open.
 Stampin' Up!'s Level 2 hostess set, Picnic Parade, is one of my favorites, but I realized that I hadn't really used the cute stamps in it much! So, at the stamping retreat, I made up some little favors for my downline and customers who attended. I also made some as my Stamp Club order favors this month. They are pretty quick to put together. The watercoloring probably took the longest. Inside is a nice Chocolate Crispy Bunny!
 I stamped the bunny from Picnic Parade in Basic Brown Classic Ink and watercolored with Stampin' Write Markers in Brocade Blue, Certainly Celery, Going Gray and Pretty in Pink. I punched it with the Wide Oval Punch. I layered it on another oval made with the Sizzix Ovals Dies. I placed it above the ribbon on the front.
.jpg)
.jpg) The next batch of Satin Ribbon Shares are going out today! I'm SO happy that Stampin' Up! put the Satin Ribbon in the Summer Mini, too, so I can continue doing the shares! You can find out more information
The next batch of Satin Ribbon Shares are going out today! I'm SO happy that Stampin' Up! put the Satin Ribbon in the Summer Mini, too, so I can continue doing the shares! You can find out more information .jpg) Stampin' Up!'s Thoughts and Prayers stamp set is really my go-to stamp set when I need sympathy cards. My mother-in-law placed an "order" for some, so I made up a dozen while I was at the stamping retreat last weekend.
Stampin' Up!'s Thoughts and Prayers stamp set is really my go-to stamp set when I need sympathy cards. My mother-in-law placed an "order" for some, so I made up a dozen while I was at the stamping retreat last weekend. 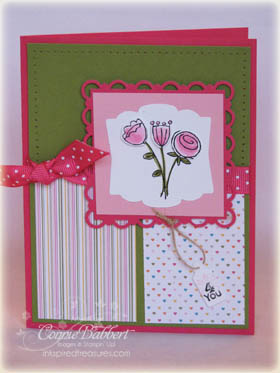
.jpg)
.jpg)
