I had time to do a couple more challenges this week! I’m feeling quite accomplished! lol! This time I used the theme from Global Design Project ” GDP179 Sweeter Than Candy” AND I used The Paper Players theme of “PP431 Spring Fever”! I thought both of them matched up pretty good for Easter Favors!
I found these plastic carrots filled with powdered candy (like Pixie Sticks) at Dollar Tree and they looked SO fun! I used them for another favor project in our newest Create with Connie and Mary Best Bunny Treat Box Collection of tutorials, too! Don’t miss out on getting it! See details here.
BEST BUNNY
This Best Bunny Easter Favor is a throwback to a holder for the Test Tubes that Stampin’ Up! used to carry. I had to adjust the size of the box to fit the candy filled carrots!

Stampin’ Details:
- The base is 3 x 9-1/4, with 9-1/4 at top of Simply Scored, score at 1, 2, 3-1/2 and 4-1/2.
- In the second 1″ panel from the bottom, punch two 3/4″ Circle holes.
- Place adhesive on the first 1″ panel, then roll up and secure to the back.
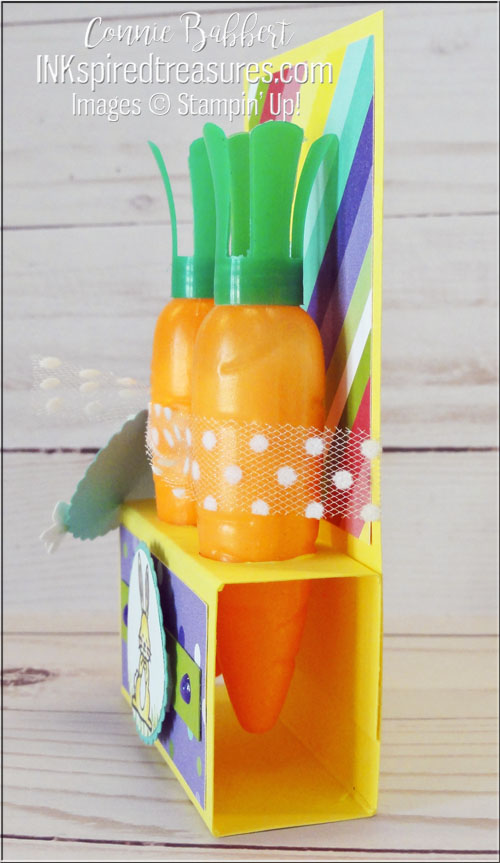
- Add 2-3/4 x 3 piece of How Sweet It Is to the back and then a 1-1/4 x 2-3/4 piece of coordinating How Sweet It Is DSP on the front.
- Add a 3/8 x 2-1/2 piece of Granny Apple Green cardstock across the front panel and two coordinating Glitter Dots.
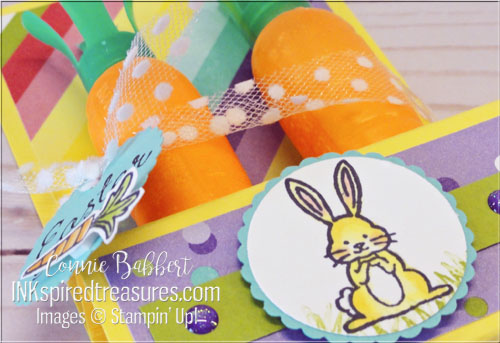
- Stamp the bunny from Best Bunny stamp set with Memento Black Ink on Whisper White and color with Pineapple Punch and Flirty Flamingo Stampin’ Blends. Add some grass stamped with Granny Apple Green Ink.
- Punch bunny with 1-1/4 Circle Punch and adhere to 1-3/8 Scallop Circle Punch. Place on front of box with Stampin’ Dimensionals.
- Place candy carrots in the holes and tie the White Organdy Polka Dot Ribbon around in a knot to secure them in the holder.
- Stamp Easter Greetings from Fable Friends stamp set with Memento Black Ink on Coastal Cabana cardstock and punch with 1-3/8 Scallop Circle Punch. Punch a 1/8″ circle at the top.
- Stamp the carrot with Memento Black Ink on scrap Whisper White, color with Pumpkin Pie and Granny Apple Green Stampin’ Blends, hand-cut and attach to tag with Mini Stampin’ Dimensional.
- Add tag by tying with the ribbon.
SUPER sweet project! I love how it turned out! I know my grandkids will adore them in their Easter Baskets this year!

Ghosts and bats and cats, oh my! The OH MY FRIGHT COLLECTION will kick off your Halloween season with sweet and spooky images! Create layers of scary fun with a twisted tree and add cats, bats, a spiderweb, a witch's hat and other accessories to decorate your cards, tags, scrapbook pages and other crafty projects! Finish with a playful Halloween greeting! We've combined the OH MY FRIGHT BUNDLE and the magical patterns in the FRIGHTFULLY FUN 12x12 DESIGNER PAPER! You'll get step-by-step tutorials for FOUR cards and TWO decorated White Gable Box ideas in our OH MY FRIGHT COLLECTION! See more details HERE!

The SIMPLY LEAVES PUNCH BUNDLE can be used for ANY season! Follow our card journey through Spring, Summer, Fall and Winter using this versatile stamp set and punch! The patterned leaves will add natural detail and texture on your cards and projects, then add one of the simple greetings to finish. We've combined the SIMPLY LEAVES PUNCH BUNDLE and the garden neutral patterns in the VALLEY OF BLOOM 12x12 DESIGNER PAPER! You'll get step-by-step tutorials for EIGHT cards...two card ideas from each season...in our SIMPLY LEAVES CARD COLLECTION! See more details HERE!

Create wonderful dimensional poinsettias in a variety of sizes with the PRETTY POINSETTIA BUNDLE! The dies cut and emboss at the same time for lots of detail and texture. The coordinating stamp images add fun seasonal greetings, sprigs and other festive touches to your cards and projects. We've combined the PRETTY POINSETTIA BUNDLE and the A STITCHED SEASON 12x12 DESIGNER PAPER for a traditional holiday look you'll love! You'll get step-by-step tutorials for SIX projects...FOUR cards and TWO favors in our PRETTY POINSETTIA COLLECTION! See more details HERE!
