Most of you know that the reason I started selling Stampin’ Up! was because of the cool 3D items that I could make using stamps and products. AND…because the color coordination of Stampin’ Up! products appeals to my “control” tendencies. They make it SO easy! Well…Easter is one of those times that I LOVE to make little 3D favors for my Easter table. So, this week on the Create with Connie and Mary Saturday Blog Hop we are featuring Easter favors! Hope you get some FUN ideas! And, since I love the little bunny in Garden Girl, I had to feature her again on my Silver Mini Gable Box!

Stampin’ Details:
- The base one of the Silver Mini Gable Boxes. They are just the perfect size for putting in some Easter grass and candy!
- The sides are decorated with a 1-3/4 x 12 piece of the polka dot pattern in Bubbles & Fizz Designer Paper (one of the FREE Sale-A-Bration Level 1 selections!).
- The flower row image in Garden Girl was stamped twice with Memento Black Ink on a 1-3/4 x 3-1/2″ piece of Whisper White cardstock, then colored with Stampin’ Blends. It was adhered to a 2 x 3-3/4 piece of Old Olive cardstock.
- The bunny was stamped with Memento Black Ink on a scrap piece of Whisper White cardstock, then colored with the Smoky Slate and Pink Pirouette Stampin’ Blends. The puffy tail is colored with the Clear Wink of Stella.

- The tag was made by punching the Tailored Tag from Calypso Coral cardstock and adding a Daffodil Delight 1-3/8″ Scallop Circle punch. Over that is a Classic Label stamped with Happy Easter from Teeny Tiny Wishes and punched from Whisper White cardstock.
- The butterfly from Garden Girl is stamped with Memento Black Ink and colored with Stampin’ Blends, then handcut and adhered to the tag with a Mini Stampin’ Dimensional.
- A 1/4″ circle was punched in the tag and a Rhinestone added for some bling.
- The top is tied closed with some Calypso Coral Shimmer Ribbon (another free Sale-a-bration selections) and the tag tied on.
LOVE it! I think my grand-daughter will get this one in her Easter basket this year! Now to figure out what to do with the boys! lol!
OK…make sure to check out the rest of the Design Team’s creations by continuing on with the blog hop…they will have some wonderful ideas! Next up is our Create with Connie & Mary website and then Mary Brown and her creative design!


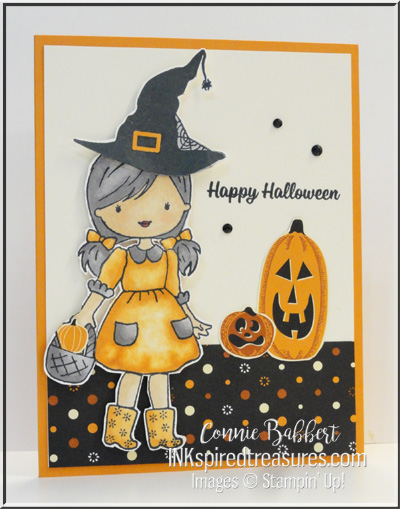
Ghosts and bats and cats, oh my! The OH MY FRIGHT COLLECTION will kick off your Halloween season with sweet and spooky images! Create layers of scary fun with a twisted tree and add cats, bats, a spiderweb, a witch's hat and other accessories to decorate your cards, tags, scrapbook pages and other crafty projects! Finish with a playful Halloween greeting! We've combined the OH MY FRIGHT BUNDLE and the magical patterns in the FRIGHTFULLY FUN 12x12 DESIGNER PAPER! You'll get step-by-step tutorials for FOUR cards and TWO decorated White Gable Box ideas in our OH MY FRIGHT COLLECTION! See more details HERE!

The SIMPLY LEAVES PUNCH BUNDLE can be used for ANY season! Follow our card journey through Spring, Summer, Fall and Winter using this versatile stamp set and punch! The patterned leaves will add natural detail and texture on your cards and projects, then add one of the simple greetings to finish. We've combined the SIMPLY LEAVES PUNCH BUNDLE and the garden neutral patterns in the VALLEY OF BLOOM 12x12 DESIGNER PAPER! You'll get step-by-step tutorials for EIGHT cards...two card ideas from each season...in our SIMPLY LEAVES CARD COLLECTION! See more details HERE!

Create wonderful dimensional poinsettias in a variety of sizes with the PRETTY POINSETTIA BUNDLE! The dies cut and emboss at the same time for lots of detail and texture. The coordinating stamp images add fun seasonal greetings, sprigs and other festive touches to your cards and projects. We've combined the PRETTY POINSETTIA BUNDLE and the A STITCHED SEASON 12x12 DESIGNER PAPER for a traditional holiday look you'll love! You'll get step-by-step tutorials for SIX projects...FOUR cards and TWO favors in our PRETTY POINSETTIA COLLECTION! See more details HERE!