
Happy Monday! It’s time for our Create with Connie and Mary Inspiration Monday challenge! Here are some FUN Snowman Cookies to inspire you this week! These look SOOO yummy…I could eat them right up!

I made a gift card holder using Snowman Season…it is getting to be that time of year, right? I love this design…so easy!
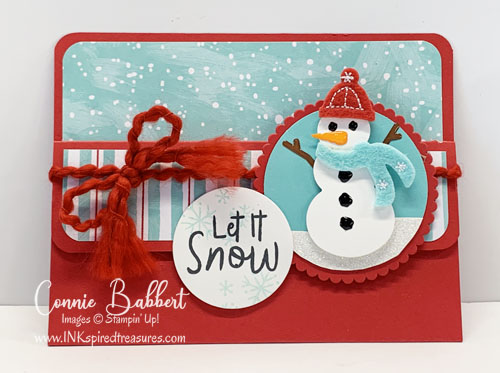
The gift card will fit vertically as I’ve shown, or horizontally. You could even fit two side by side!

Stampin’ Details:
-
- The base is 5-1/2 x 8-1/2 Real Red cardstock, scored at 5-1/2 and 7. Fold in half, then fold the small flap down. Adhere the two sides together below the short flap.
- Round the corners at the top and on the flap with a Corner Rounder.
- Cut 1-1/4 x 5-1/4 Let it Snow striped print Designer Paper for the flap, round the bottom corners and adhere.
- Cut 1-1/2 x 5-1/4 Let it Snow “snow” print Designer Paper for the top back, round the top corners and adhere.
- Wrap the Real Red Curly Ribbon around the flap and tie a bow. Adhere to flap to the bottom with Stampin’ Dimensionals.
- Punch 2-1/4 circle from Coastal Cabana cardstock.
- Cut a 1 x 3 piece of Sparkle Glimmer Paper for snow bank, cut to curve of circle shape. Adhere to bottom of circle.
- Add circle to Scallop Layering Circle slightly larger than 2-1/4. Adhere together. Add to flap with Stampin’ Dimensionals.
- Punch snowman with Snowman Builder Punch from Whisper White cardstock.
- Add Let it Snow Embellishment face, buttons, arms, felt scarf and hat from Kit. Add to circle with Stampin’ Dimensionals.
- Stamp Let it Snow from Snowman Season stamp set with Memento Black Ink on Whisper White cardstock, stamp off snowflakes with Coastal Cabana Ink around greeting. Cut with 1-5/8 Layering Circle. Adhere next to snowman with Stampin’ Dimensionals.

Wouldn’t you LOVE to get a gift card with this darling snowman on it? Those cookies were great inspiration! OK, make sure to check out what Mary did with this challenge over on Create with Connie and Mary!

Ghosts and bats and cats, oh my! The OH MY FRIGHT COLLECTION will kick off your Halloween season with sweet and spooky images! Create layers of scary fun with a twisted tree and add cats, bats, a spiderweb, a witch's hat and other accessories to decorate your cards, tags, scrapbook pages and other crafty projects! Finish with a playful Halloween greeting! We've combined the OH MY FRIGHT BUNDLE and the magical patterns in the FRIGHTFULLY FUN 12x12 DESIGNER PAPER! You'll get step-by-step tutorials for FOUR cards and TWO decorated White Gable Box ideas in our OH MY FRIGHT COLLECTION! See more details HERE!

The SIMPLY LEAVES PUNCH BUNDLE can be used for ANY season! Follow our card journey through Spring, Summer, Fall and Winter using this versatile stamp set and punch! The patterned leaves will add natural detail and texture on your cards and projects, then add one of the simple greetings to finish. We've combined the SIMPLY LEAVES PUNCH BUNDLE and the garden neutral patterns in the VALLEY OF BLOOM 12x12 DESIGNER PAPER! You'll get step-by-step tutorials for EIGHT cards...two card ideas from each season...in our SIMPLY LEAVES CARD COLLECTION! See more details HERE!

Create wonderful dimensional poinsettias in a variety of sizes with the PRETTY POINSETTIA BUNDLE! The dies cut and emboss at the same time for lots of detail and texture. The coordinating stamp images add fun seasonal greetings, sprigs and other festive touches to your cards and projects. We've combined the PRETTY POINSETTIA BUNDLE and the A STITCHED SEASON 12x12 DESIGNER PAPER for a traditional holiday look you'll love! You'll get step-by-step tutorials for SIX projects...FOUR cards and TWO favors in our PRETTY POINSETTIA COLLECTION! See more details HERE!


 Stampin’ Details:


